CUDA it Be Any Faster?
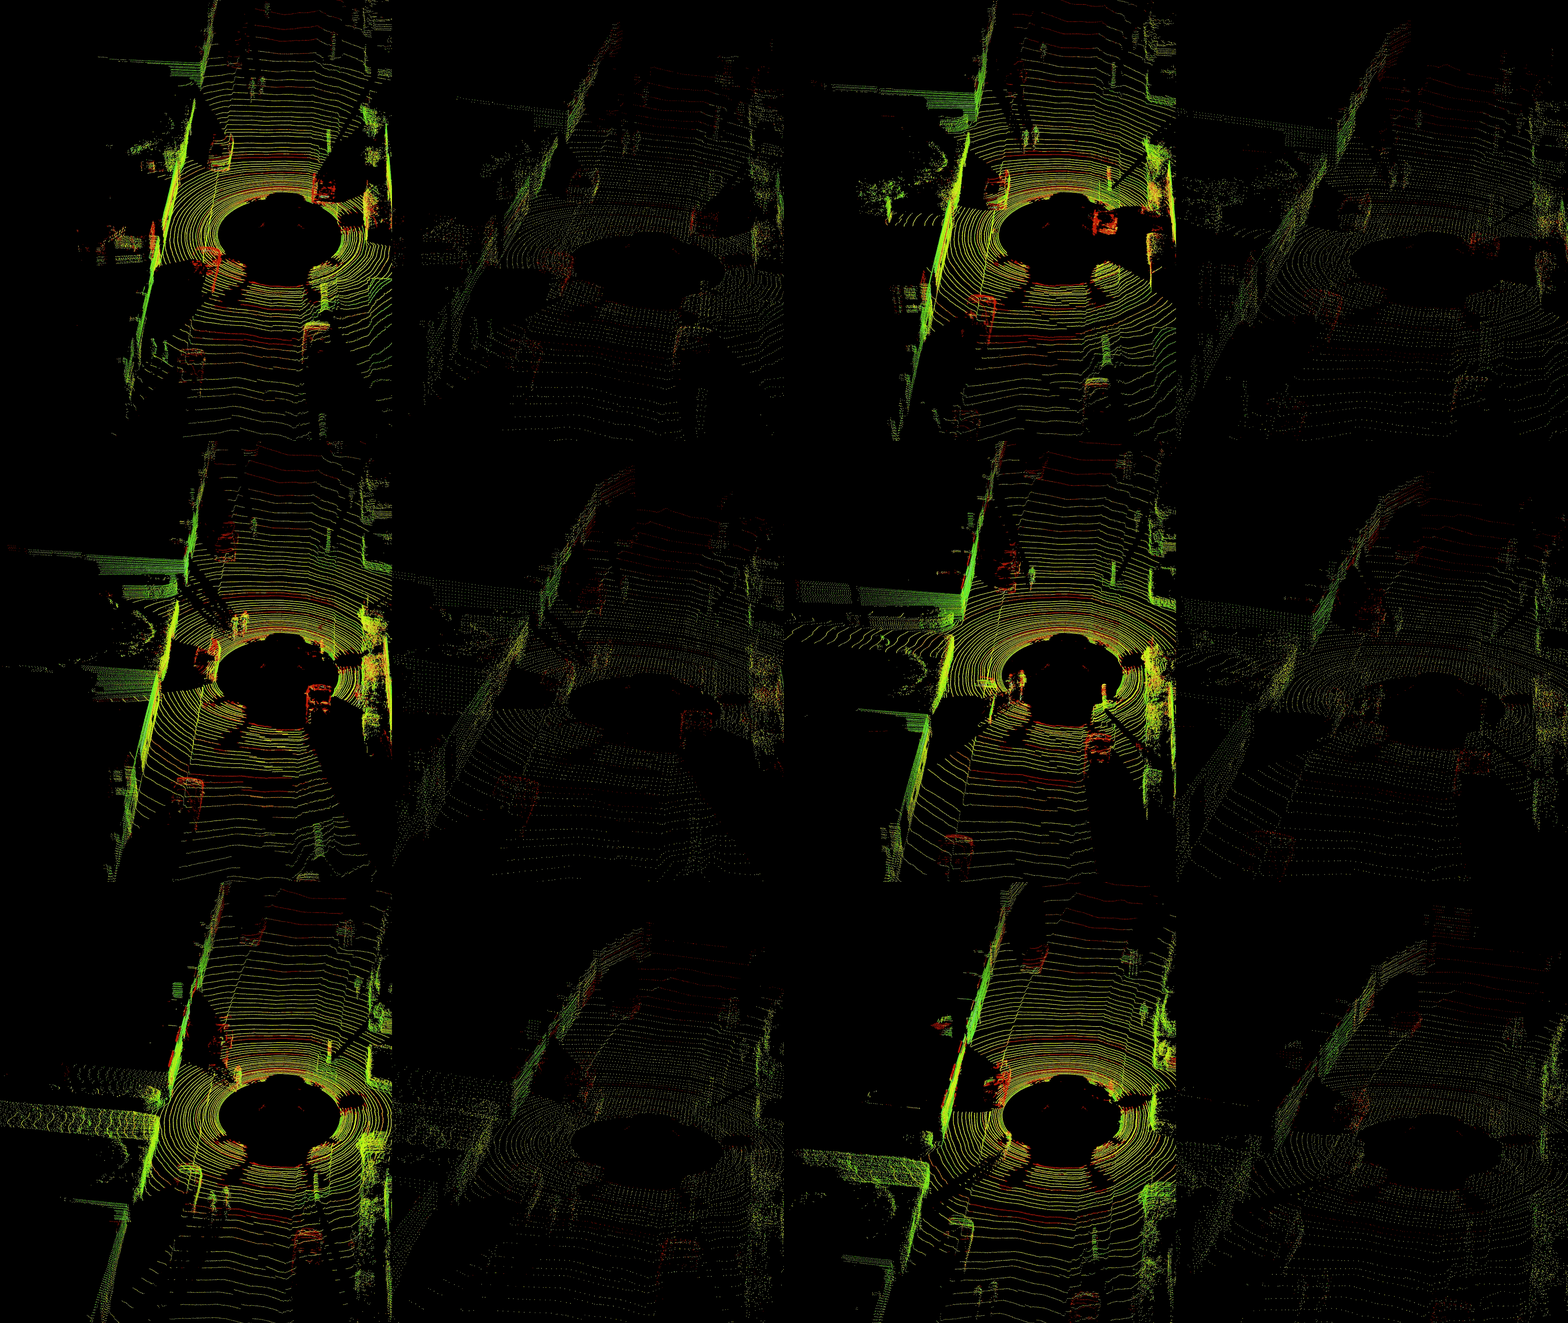
Experience the exhilarating world of NVIDIA’s CUDA programming as we revolutionize point cloud processing in computer vision and robotics. Voxelization, the process of converting 3D points into discrete voxels, has faced challenges with traditional CPU-based methods, limiting groundbreaking innovations. But fear not, as we harness the immense power of parallelization for a monumental leap of over 580x times over traditional CPU! Dive into CUDA’s awe-inspiring realm, where each point gets its own thread, enabling lightning-fast voxelization and opening the doors to real-time applications. Join us on this thrilling ride and witness the magic of CUDA as we rewrite the future of point cloud processing. Let’s embrace the sheer power of CUDA together and change the game!
Why Should You Read This Blog?
Buckle up as we’re about to embark on an exhilarating journey into the world of NVIDIA GPU programming and CUDA wizardry. So, grab your favorite caffeinated beverage and prepare for some adrenaline-pumping excitement!
Now, you might be wondering, “Why should I read this blog? Is it going to be another dull and dreary technical piece?” Well, fear not! This blog is anything but ordinary. We’re here to show you the mind-blowing power of CUDA programming on NVIDIA GPUs, and we’ve got a jaw-dropping example to demonstrate just that: voxelization!
Okay, you might be thinking, “Voxelization? What in the world is that? Sounds like a made-up word from a sci-fi movie!” Well, in a way, it kind of is! Voxelization is the magical process of taking a ginormous LiDAR point cloud and breaking it down into tiny cubic chunks called voxels. Think of it as pixelating a 3D world, but on a whole new level!
Now, hold on to your seat because here comes the fun part: we’re going to do all this voxelization stuff using the mighty NVIDIA GPUs and CUDA. That’s right, the same GPUs used in gaming rigs to unleash stunning graphics and epic frame rates are going to help us crunch numbers like there’s no tomorrow. Together, we’ll venture into the depths of parallel programming, where our algorithms will run at supersonic speeds, leaving ordinary CPUs gasping for breath. Instead of using the age old for-loops to process every point one after another, we will process these points, all at once, by using a seperate thread for every point in the point cloud. This way, we make every thread count, squeezing out every ounce of performance, that the NVIDIA GPU has to offer. These concepts of parallelization that we will use for point-cloud processing can be seamlessly used for any other realm where parallelization is an option.
But beware! As we venture further into the realm of CUDA programming, things might get a bit hairy. New concepts and parallel programming lingo might make you scratch your head in confusion. But hey, don’t give up just yet! Remember, the path to greatness is often paved with challenges. And in this case, the reward at the end of the tunnel is an unreal, mind-boggling, jaw-dropping 580x speedup!
Yes, you heard that right! By the time we’re done here, you’ll have a GPU-based voxelization algorithm that can chew through mountains of LiDAR data at an incredible speed, leaving your CPU-bound counterparts in the dust. It’s like having a supersonic jet compared to a horse-drawn carriage!
So, stick with us, and we promise it’ll be worth it. Sure, there might be moments when you feel like you’re lost in a maze of CUDA syntax or buried under an avalanche of parallel processing concepts. But fear not, brave adventurer! We’re here to guide you, step by step, through the intricacies of GPU programming.
So, are you ready for the ride of a lifetime? Strap on your GPU-powered jetpack, and let’s dive into the mind-bending universe of CUDA programming and voxelization. Together, we’ll unlock the secrets of parallel processing and witness the awe-inspiring 580x speedup that will leave you marveling at the wonders of modern technology!
1. What is Voxelization?
Voxelization is a fundamental process in computer graphics and 3D data analysis that involves converting continuous 3D space into a discrete representation using small cubic units known as “voxels.” The term voxel is a combination of volume and pixel, and it serves as the 3D equivalent of a 2D pixel.
Imagine we have a 3D object or scene that we want to represent digitally. Voxelization begins by enclosing this continuous 3D space within an imaginary 3D grid. This grid subdivides the entire space into a series of equally-sized cubic voxels, and each cell is a voxel. Similar to pixels in a 2D image, each voxel corresponds to a specific region within the 3D space.
The next step is to analyze the contents of each voxel and determine whether it is occupied or empty. This process is often referred to as filling the voxels. To fill the voxels, we examine the objects or entities within the 3D space and determine which voxels they intersect or occupy.
For example, consider a 3D point cloud obtained from a LiDAR sensor. Each point in the point cloud represents a 3D coordinate in space. During voxelization, the points falling within a voxel’s boundaries are considered as occupied while the voxels without any points are empty.
By analyzing the presence or absence of objects in each voxel, we create a binary representation of the 3D space. The voxels that are occupied are marked with a value of 1, while the empty voxels are assigned a value of 0. This binary representation forms a digital 3D model, often referred to as a voxel grid or voxel map.
In the context of this blog, voxelization refers to the initial step of assigning individual 3D points from a LiDAR point cloud to discrete voxels within a 3D grid. Each voxel represents a small cubic region in the 3D space, and the process of voxelization categorizes points based on their spatial location. Points falling within a voxel’s boundaries are considered “occupied,” while voxels without any points are labeled as “empty.”
After the voxelization step, the blog proceeds to feature extraction. In this step, we compute the average of certain features for all the points that belong to each voxel. The features of interest in our case are the x, y, z coordinates, and the intensity of the LiDAR points. By averaging these features for all the points within a voxel, we obtain a condensed representation of the original point cloud data.
The voxelization and feature extraction steps are essential in processing large-scale LiDAR point cloud data efficiently and effectively. They provide several key benefits:
Data Summarization: Voxelization enables us to partition the complex and continuous point cloud data into smaller, discrete units, represented by voxels. This categorization allows us to summarize the content of the entire point cloud and simplifies subsequent analysis.
Reduced Computational Complexity: The process of assigning points to voxels significantly reduces the computational burden by processing points at a voxel level rather than individually. This reduction in complexity is crucial when dealing with massive point cloud datasets, as it enables faster processing and analysis.
Compact Representation: Feature extraction by averaging the x, y, z coordinates, and intensity within each voxel results in a compact representation of the original point cloud. Instead of dealing with millions of individual points, we obtain summarized information for each voxel, making it more manageable for downstream tasks.
Efficient Task-Specific Analysis: The condensed representation obtained through feature extraction provides valuable insights for various 3D tasks such as object detection, moving object segmentation, velocity estimation, and more. By processing voxel-level information, these tasks become computationally tractable and more efficient.
2. Primer on CUDA Programming
Before we embark on the exhilarating journey of GPU-powered voxelization, let’s take a moment to familiarize ourselves with the essence of CUDA programming. If you’re new to this realm, fear not, for we shall unravel the key concepts step by step, and soon, you’ll be navigating through the seas of parallel processing with confidence.
Understanding CUDA: The Power of Parallelism
At its core, CUDA is NVIDIA’s powerful parallel computing platform and programming model. It harnesses the raw computational might of NVIDIA GPUs to tackle intricate problems at breathtaking speeds. Imagine orchestrating a symphony where hundreds or thousands of independent operations perform in harmony, each contributing to the grand performance.
The Building Blocks of CUDA: Threads, Blocks, and Grids
CUDA operates on the principles of threads, blocks, and grids. Threads are the elemental units of computation, executing independently on the GPU. They group together into blocks, and these blocks, in turn, form a grid. This orchestrated arrangement of threads, blocks, and grids conducts the seamless symphony of parallelism.
A Simple CUDA Example: Adding Numbers in Parallel
Let’s commence our CUDA journey with a classic example: adding numbers in parallel. This seemingly simple task is a profound introduction to the world of parallel processing.
#include <iostream>
#include <cuda_runtime.h>

// CUDA kernel to add two arrays in parallel
__global__ void addNumbers(float* a, float* b, float* c, int numElements) {
    int tid = blockDim.x * blockIdx.x + threadIdx.x;
    if (tid < numElements) {
        c[tid] = a[tid] + b[tid];
    }
}

int main() {
    // Array size and memory allocation
    int numElements = 1000000;
    size_t size = numElements * sizeof(float);
    float* h_a = (float*)malloc(size);
    float* h_b = (float*)malloc(size);
    float* h_c = (float*)malloc(size);

    // Initialize arrays with some values
    for (int i = 0; i < numElements; ++i) {
        h_a[i] = i;
        h_b[i] = 2 * i;
    }

    // Allocate GPU memory
    float* d_a = nullptr;
    float* d_b = nullptr;
    float* d_c = nullptr;
    cudaMalloc((void**)&d_a, size);
    cudaMalloc((void**)&d_b, size);
    cudaMalloc((void**)&d_c, size);

    // Copy input arrays from host to GPU memory
    cudaMemcpy(d_a, h_a, size, cudaMemcpyHostToDevice);
    cudaMemcpy(d_b, h_b, size, cudaMemcpyHostToDevice);

    // Launch the CUDA kernel with 256 threads per block
    int blockSize = 256;
    int numBlocks = (numElements + blockSize - 1) / blockSize;
    addNumbers<<<numBlocks, blockSize>>>(d_a, d_b, d_c, numElements);

    // Copy the result from GPU memory back to host
    cudaMemcpy(h_c, d_c, size, cudaMemcpyDeviceToHost);

    // Free GPU memory and host arrays
    cudaFree(d_a);
    cudaFree(d_b);
    cudaFree(d_c);
    free(h_a);
    free(h_b);
    free(h_c);

    return 0;
}
Code Explanation:
-
__global__Function: TheaddNumbersfunction is marked as a__global__function. This indicates that it’s a GPU kernel that will be executed on the GPU. -
Kernel Launch: The kernel is launched with the
<<<numBlocks, blockSize>>>syntax, specifying the number of blocks (numBlocks) and the number of threads per block (blockSize). Each block contains multiple threads, and the threads execute the kernel function in parallel. -
Thread Indexing: The
tid(thread ID) is calculated using theblockDim.x,blockIdx.x, andthreadIdx.xbuilt-in variables. Each thread knows its global ID, allowing it to access the corresponding elements in arraysa,b, andc. -
Array Initialization: Three arrays
h_a,h_b, andh_care allocated in host memory (malloc) and initialized with some values. These arrays represent the input arraysa,b, and the output arrayc. -
Memory Allocation and Data Transfer: Memory is allocated on the GPU using
cudaMalloc, and the input arraysh_aandh_bare copied to the GPU memory usingcudaMemcpy. -
Kernel Execution: The
addNumberskernel is launched with the specified number of blocks and threads per block. Each thread computes the sum of the corresponding elements ofaandb, storing the result in arraycon the GPU. -
Result Retrieval: The result is copied back from the GPU memory to the host array
h_cusingcudaMemcpy. -
Memory Deallocation: GPU memory is freed using
cudaFree, and host arrays are freed usingfree.
Compiling the CUDA Code with CMake
To compile the CUDA code, we can use CMake, a popular build system that supports CUDA projects. Below is a minimal CMakeLists.txt file to build the CUDA example:
cmake_minimum_required(VERSION 3.10)
project(CUDAExample)

# Find CUDA
find_package(CUDA REQUIRED)

# Set C++ version
set(CMAKE_CXX_STANDARD 14)

# Include CUDA headers
include_directories(${CUDA_INCLUDE_DIRS})

# Add the CUDA source file and executable
cuda_add_executable(cuda_example main.cu)
Executing the CUDA Code
Once the CMakeLists.txt file is prepared, follow these steps to execute the CUDA example:
- Create a directory (e.g., build) to build the project:
mkdir build cd build - Generate the Makefile using CMake:
cmake .. - Build the project:
make - Run the CUDA executable:
./cuda_example
And with that, we cover the basics of CUDA ,and we are now ready to witness how these concepts are harnessed to implement highly efficient voxelization using the parallel processing capabilities of GPUs. Before we embark on this exciting journey into the world of GPU-accelerated voxelization, let’s delve deeper into the intuition and mechanics of this process. Get ready to experience the wonders of voxelization and the incredible performance boost it brings!
3. Intuition
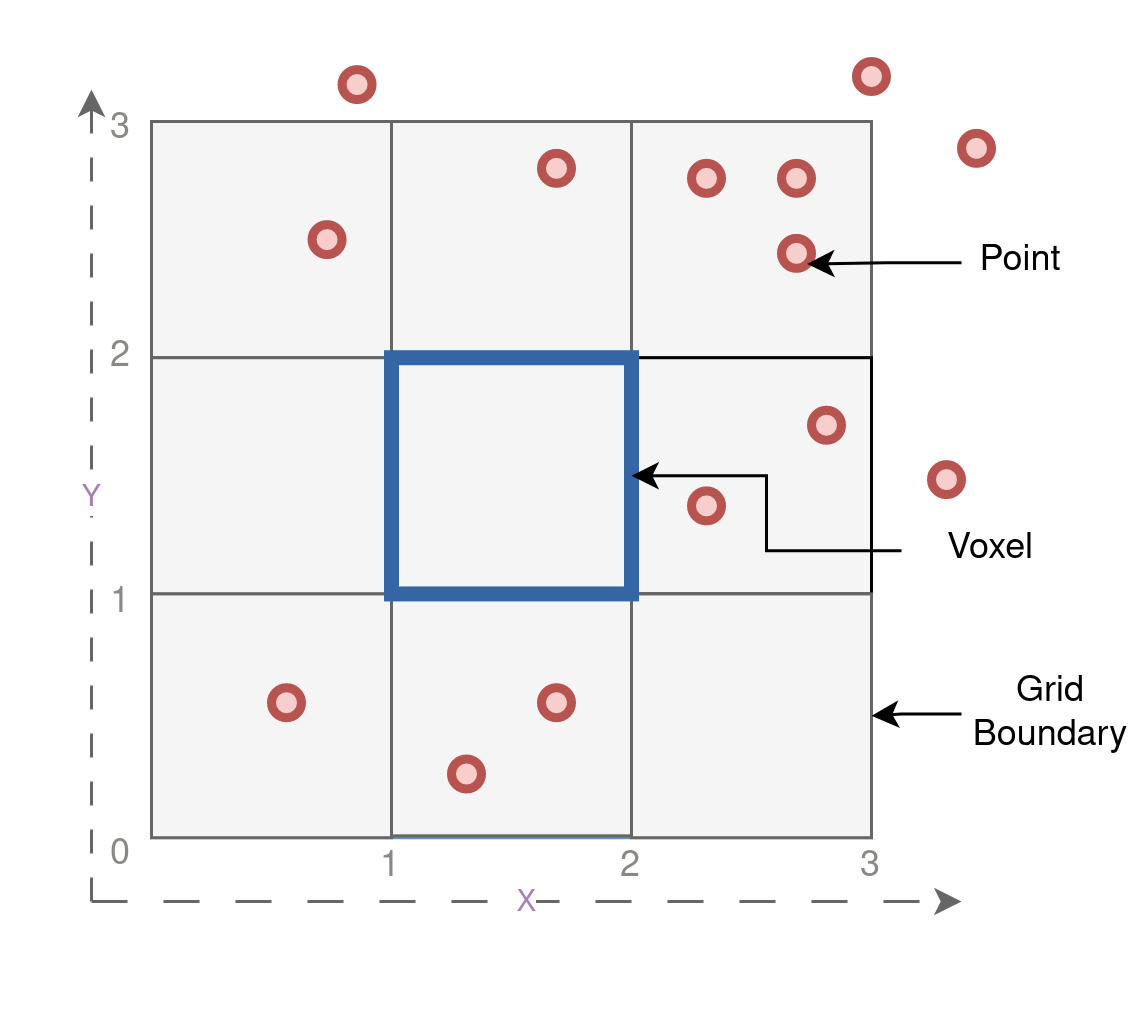
In this section, we will embark on an intuitive exploration of the point cloud voxelization process using CUDA. To that end, let’s first set the stage by taking a look at a simple 2D grid. We’ll create a 3x3 grid and randomly select 14 points with most points within its boundaries. Some points will also lie slightly outside the grid to make the example more interesting. The voxels here are analogous to voxels. Visualizing this grid and its sample points, we get the following plot:
Now, let us understand one last detail before we begin the actual processing. In the figure shown below, on the left, we have a 2D grid representing the voxels with their corresponding indices ranging from (0, 0) to (2, 2). Each voxel in the grid is identified by its x and y coordinates, starting from the bottom-left corner and progressing towards the top-right corner. However, from now on, we will refer to this serialized integer index as voxel_offset, which uniquely represents each voxel in a sequential order from 0 to 8, as shown on the right side of the figure.
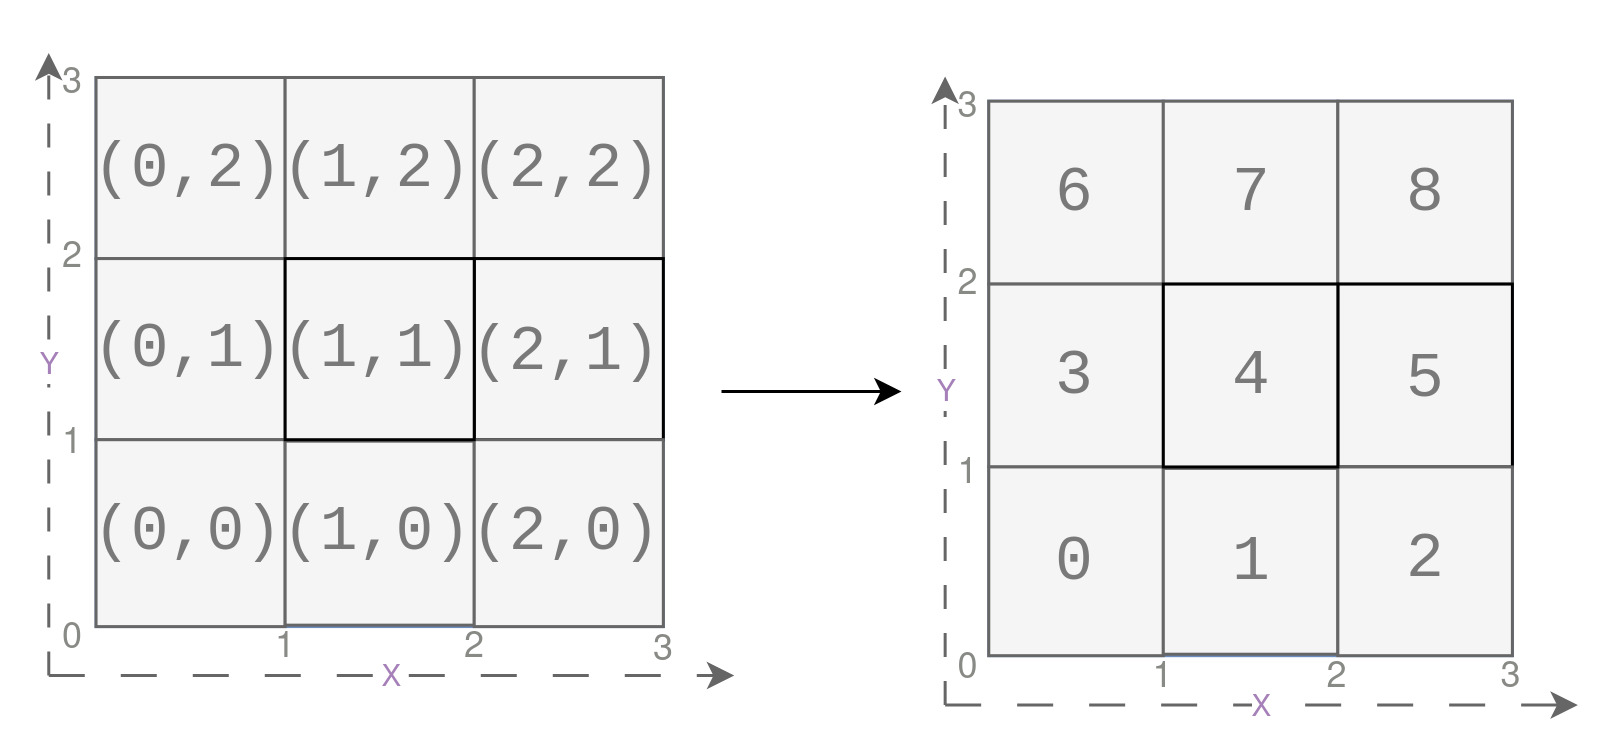
This voxel_offset plays a crucial role in the upcoming CUDA-based voxelization process, allowing us to efficiently access and process voxel data in a linear manner. By representing the grid in this serialized format, we can easily map each voxel’s position to its corresponding voxel ID, making the hash map implementation more streamlined and intuitive. These concepts will get clear later.
The process of converting a point cloud to voxels using CUDA involves three main steps: hash map building, voxelization, and feature extraction as shown in the Figure below. Hash map building efficiently stores information about unique voxels that contain points, eliminating the need to process all grid voxels. Voxelization assigns each point to its corresponding voxel, creating a serialized array that stores point features for all voxels. Finally, feature extraction calculates the average features for each voxel, resulting in an efficient representation of point cloud features. In all of these steps, CUDA programming helps in parallelization, in that, every point or every voxel is processed on a seperate thread in parallel. In the following section we will understand each of these steps intuitively using our toy example before we delve into the real deal.

A. Build Hashmaps
Now, let’s explore the first step of building hash maps. Before diving into the intricacies of building hash maps, it’s essential to understand why they are necessary. In our 3x3 grid example, we observed that out of the 9 voxels, only 6 voxels contain points, while the remaining 3 voxels are entirely empty (as marked in red in the figure below). This situation presents a compelling opportunity for optimization, as processing all 9x9 voxels would be highly inefficient and computationally wasteful. That’s where hash maps comes into play.
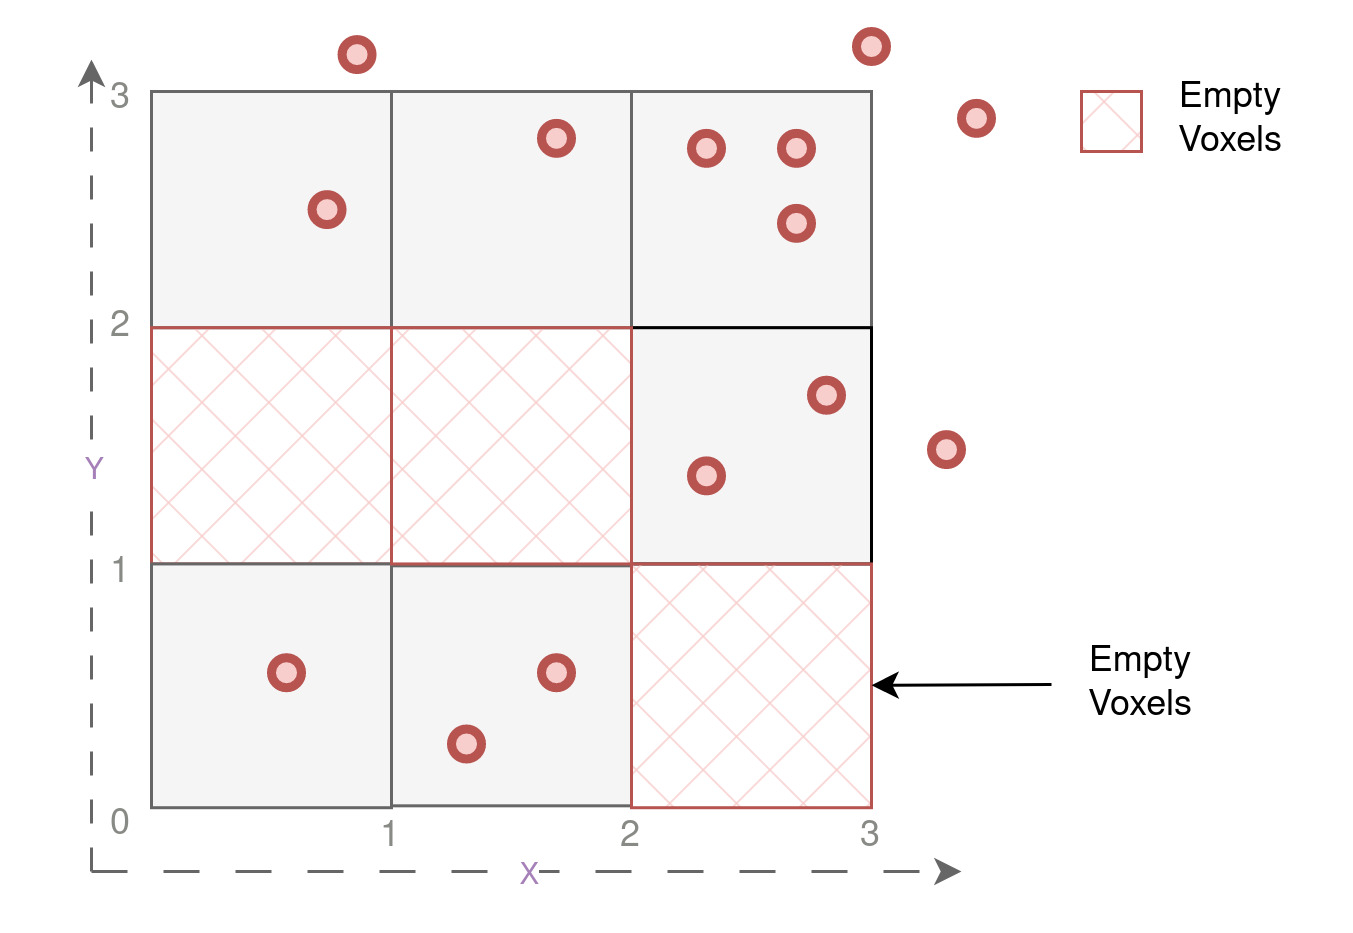
Hash maps offer an efficient way to store and access data by associating each voxel’s position with its corresponding information. By directly mapping the unique voxel positions as keys( voxel_offset as described earlier to their respective voxel_ids ( will be explained soon) as values, we can efficiently eliminate the need to process all the empty voxels. This approach drastically reduces memory consumption and processing time, making voxelization of point clouds significantly faster and more resource-efficient. We perform several operations on every point in the point cloud, for building the hash map. All these operation is performed for each point on a seperate thread in parallel using CUDA. Let’s now understand how we go from our scattered 2D points, with certain empty voxels, to an efficient and compact hashmap :
- Filtering Points: We begin by filtering out all the points that lie outside the defined boundary. These points are not relevant for our voxelization and can be safely excluded from further processing.
-
Voxel Computation : We take each remaining point from the filtered set and calculate its corresponding voxel indices (voxel_x, voxel_y) using a general point-to-voxel clamping technique. This process ensures that each point is precisely associated with a specific voxel in the 2D grid.
Let’s consider an example point from our 2D grid with coordinates
(1.8, 2.5). To convert this point into a voxel, we essentially applyflooroperation to both the coordinates of the points. The actual computation is a little more involved, but we will cover that in later section.Original Point:[1.8, 2.5] Clamped Point: [floor(1.8), floor(2.5)] =[1, 2]Now, the clamped point
(1, 2)represents the voxel indices(voxel_x, voxel_y)in the 2D grid. This means that the original point(1.8, 2.5)is associated with the voxel at grid position(1, 2). By performing this computation for all points, we establish a one-to-one mapping between each point and its respective voxel in the 2D grid. - Hash Table Insertion: Next, we start the hash table insertion, by passing the key as
voxel_offset. The corresponding value for this key is the unique voxel counter, reffered to asvoxel_id, which counts the current number of voxels being added to the hash table. The hash table is a simple array like data structure, which stores all keys first, followed by their corresponding values as shown in the Figure below.
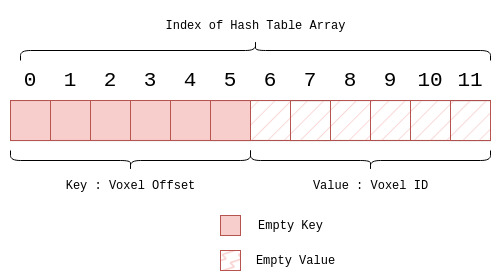
The insertion essentially happens in three steps :
-
Hashing the Key (Voxel_Offset): The first step in the insertion process is to hash the given key, which represents the
voxel_offset. Hashing is a mathematical function that transforms the key into a unique numeric value. In our example, we use a simple hash function that involves multiplying thevoxel_offsetby 2. -
Modulus Operation to Find Slot: After hashing the key, we apply the
modulus(%)operation with the size of the hash table divided by 2. This helps us find the slot in the hash table where the key-value pair should be inserted. The modulus operation ensures that the slot index remains within the valid range of the hash table. -
Compare and Swap Operation: The final step is to perform the compare and swap operation (CAS) on the hash table at the slot obtained from the modulus operation. The CAS operation checks if the slot is empty. If it is, the insertion is successful, and the key-value pair is placed in that slot. However, if the slot is not empty, it indicates a collision, meaning that another key with the same hash value already occupies that slot. In this case, we need to handle the collision by employing a linear probing technique, where we check the next slot in the hash table until we find an empty slot. Here we have assumed the size of hash table to be 12, but in practice the size of the hash table is much larger than number of keys, to avoid collisions.
By following these three basic steps, we can efficiently insert points into the hash table, associating each voxel’s position with its corresponding unique ID. This enables us to store relevant information about the voxels containing points and optimize the voxelization process. A gentle reminder, that these steps occur every point on seperate thread in parallel. Now, let’s dive into an example to illustrate this process in action.
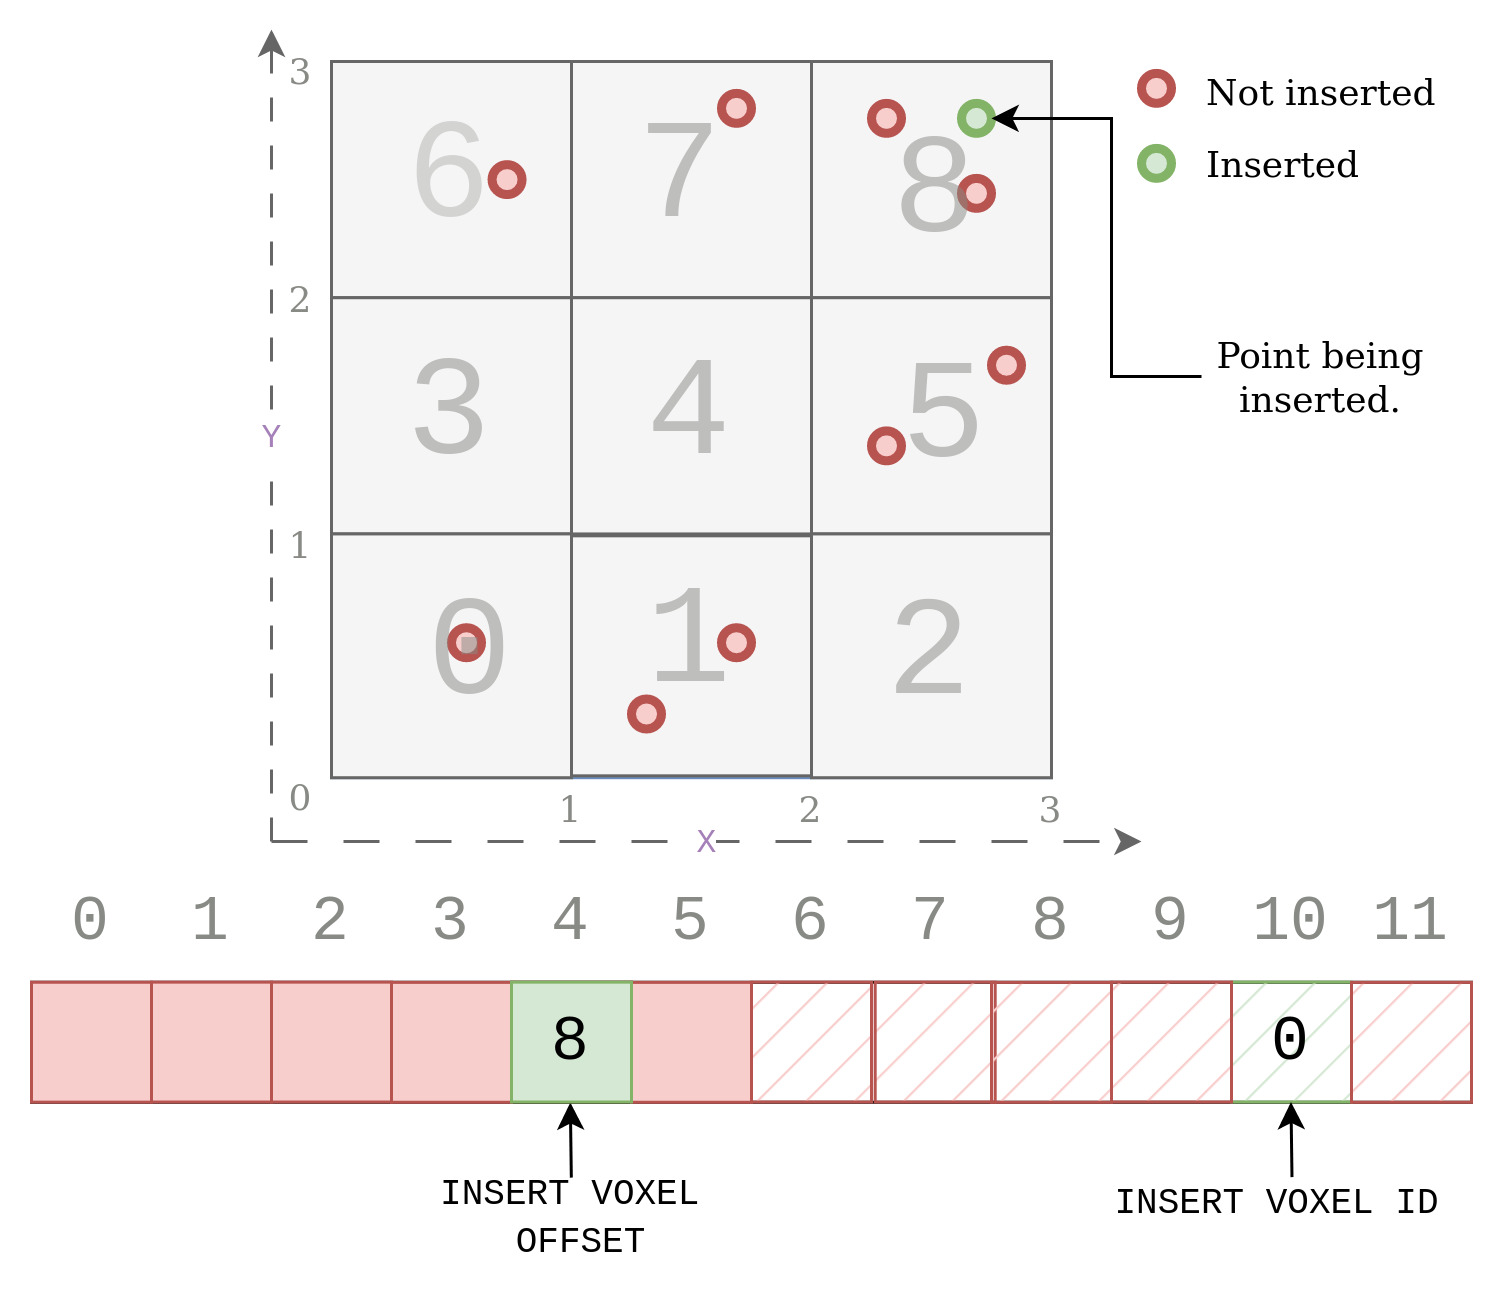
Example 1
Psuedo Code : Example 1

INSERTION 1 : Pt(2.3,2.8)

/* Simple case where the slot for the given key is empty.
We just insert the key to this slot and increment the value of total voxels by 1.*/

Step 1 : Voxel Computation
voxel_x = floor(2.3) = 2
voxel_y = floor(2.8) = 2
voxel_offset = (voxel_y * size_y) + voxel_x  = 2*3 + 2 = 8
key = voxel_offset

Step 2 : Hashing of key
hash_key = hash(key) = key*2 = 8*2 = 16.

Step 3 : Find Slot using Modulus
slot = hash_key%(hash_size/2) = 16%6 = 4

Step 4 : Compare And Swap
value = total_voxels = 0.
// simple case
hash_table[slot] = key
hash_table[slot+hash_size/2] = value
total_voxel++
As seen in the figure below, we simply insert the given key 8, at the computed slot 4, because it was empty. Then we insert the corresponding value at slot 10, (4+6). The value is zero because this is the first unique voxel being inserted in the hash table.
Example 2
Psuedo Code : Example 2

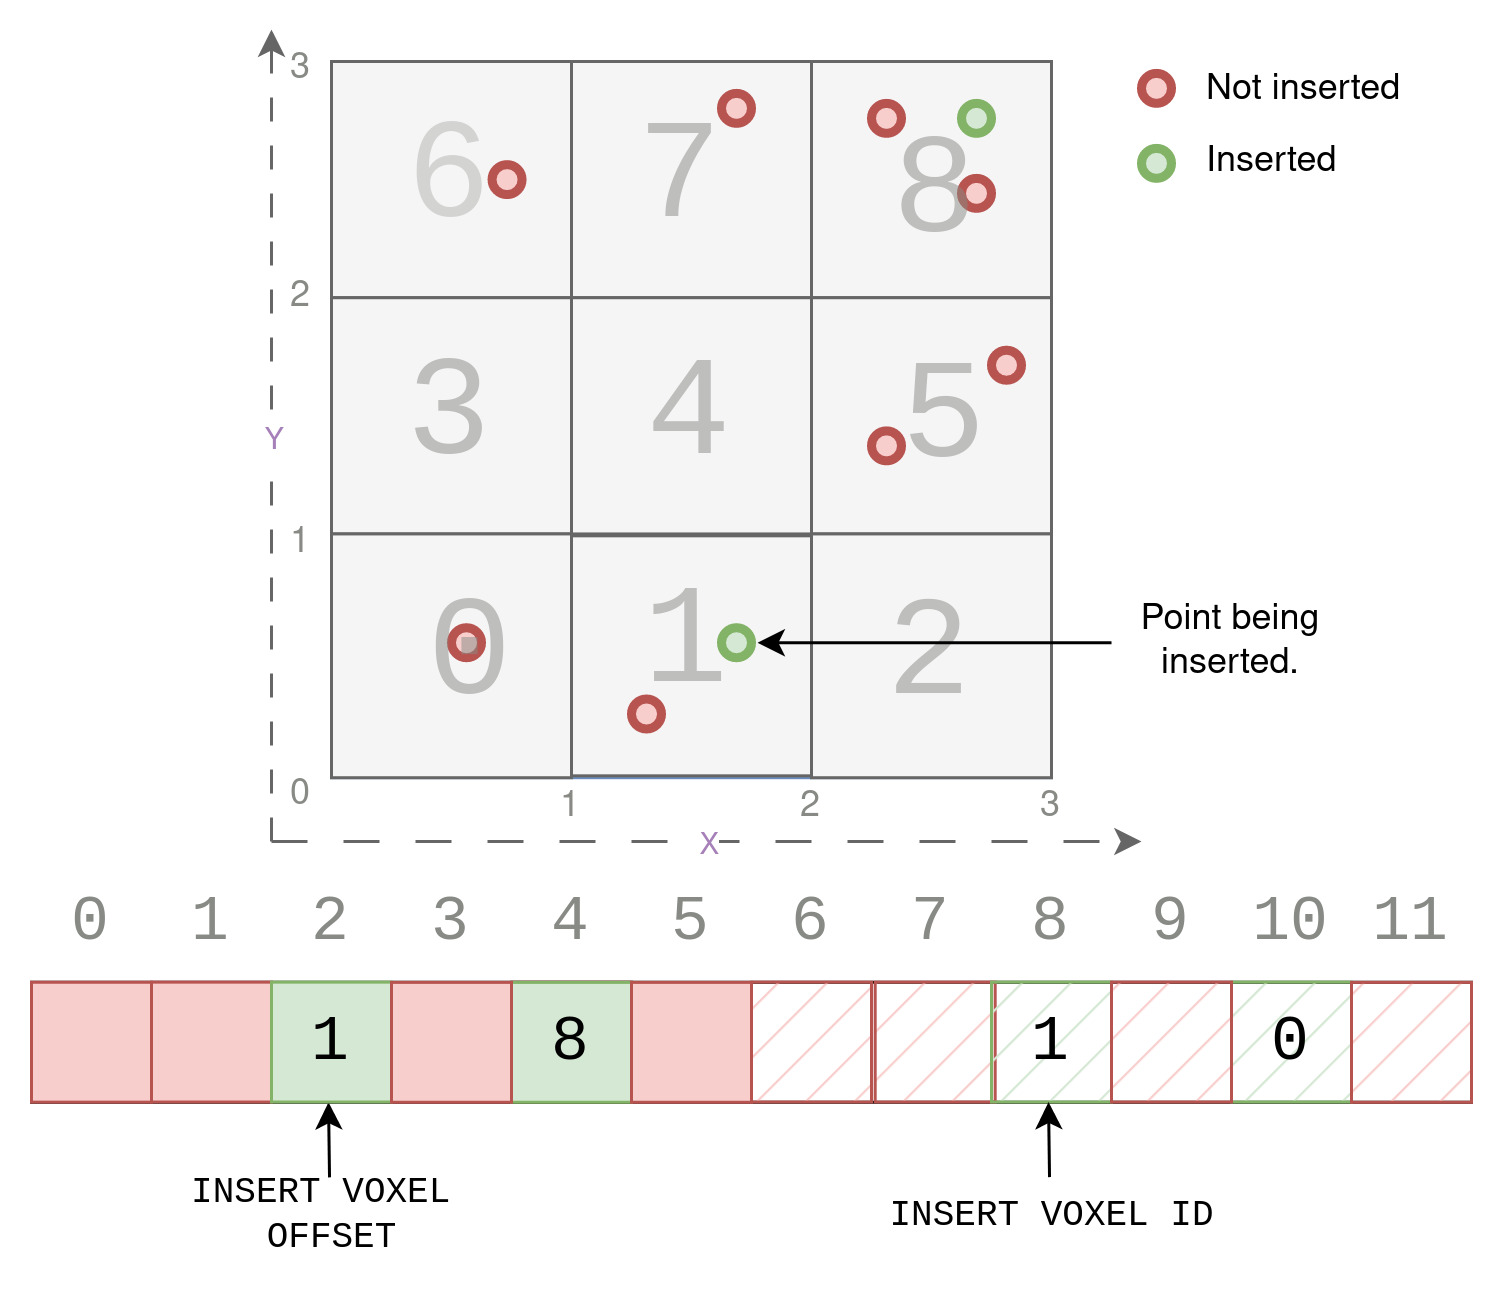
INSERTION 2 : Pt(1.8,0.5)

/* Simple case where the slot for the given key is empty.
We just insert the key to this slot and increment the value of total voxels by 1.*/

Step 1 : Voxel Computation
voxel_x = floor(1.8) = 1
voxel_y = floor(0.5) = 0
voxel_offset = (voxel_y * size_y) + voxel_x = 0*3 + 1 = 1
key = voxel_offset

Step 2 : Hashing of key
hash_key = hash(key) = key*2  = 1*2 = 2.

Step 3 : Find Slot using Modulus
slot = hash_key%(hash_size/2) = 2%6 = 2

Step 4 : Compare And Swap
value = total_voxels = 1.
// simple case
hash_table[slot] = key
hash_table[slot+hash_size/2] = value
total_voxel++
As seen in the figure below, we simply insert the given key 1, at the computed slot 2, because it was empty. Then we insert the corresponding value at slot 8, (2+6). The value is the count of the current voxels, which is 1.
Example 3
Psuedo Code : Example 3

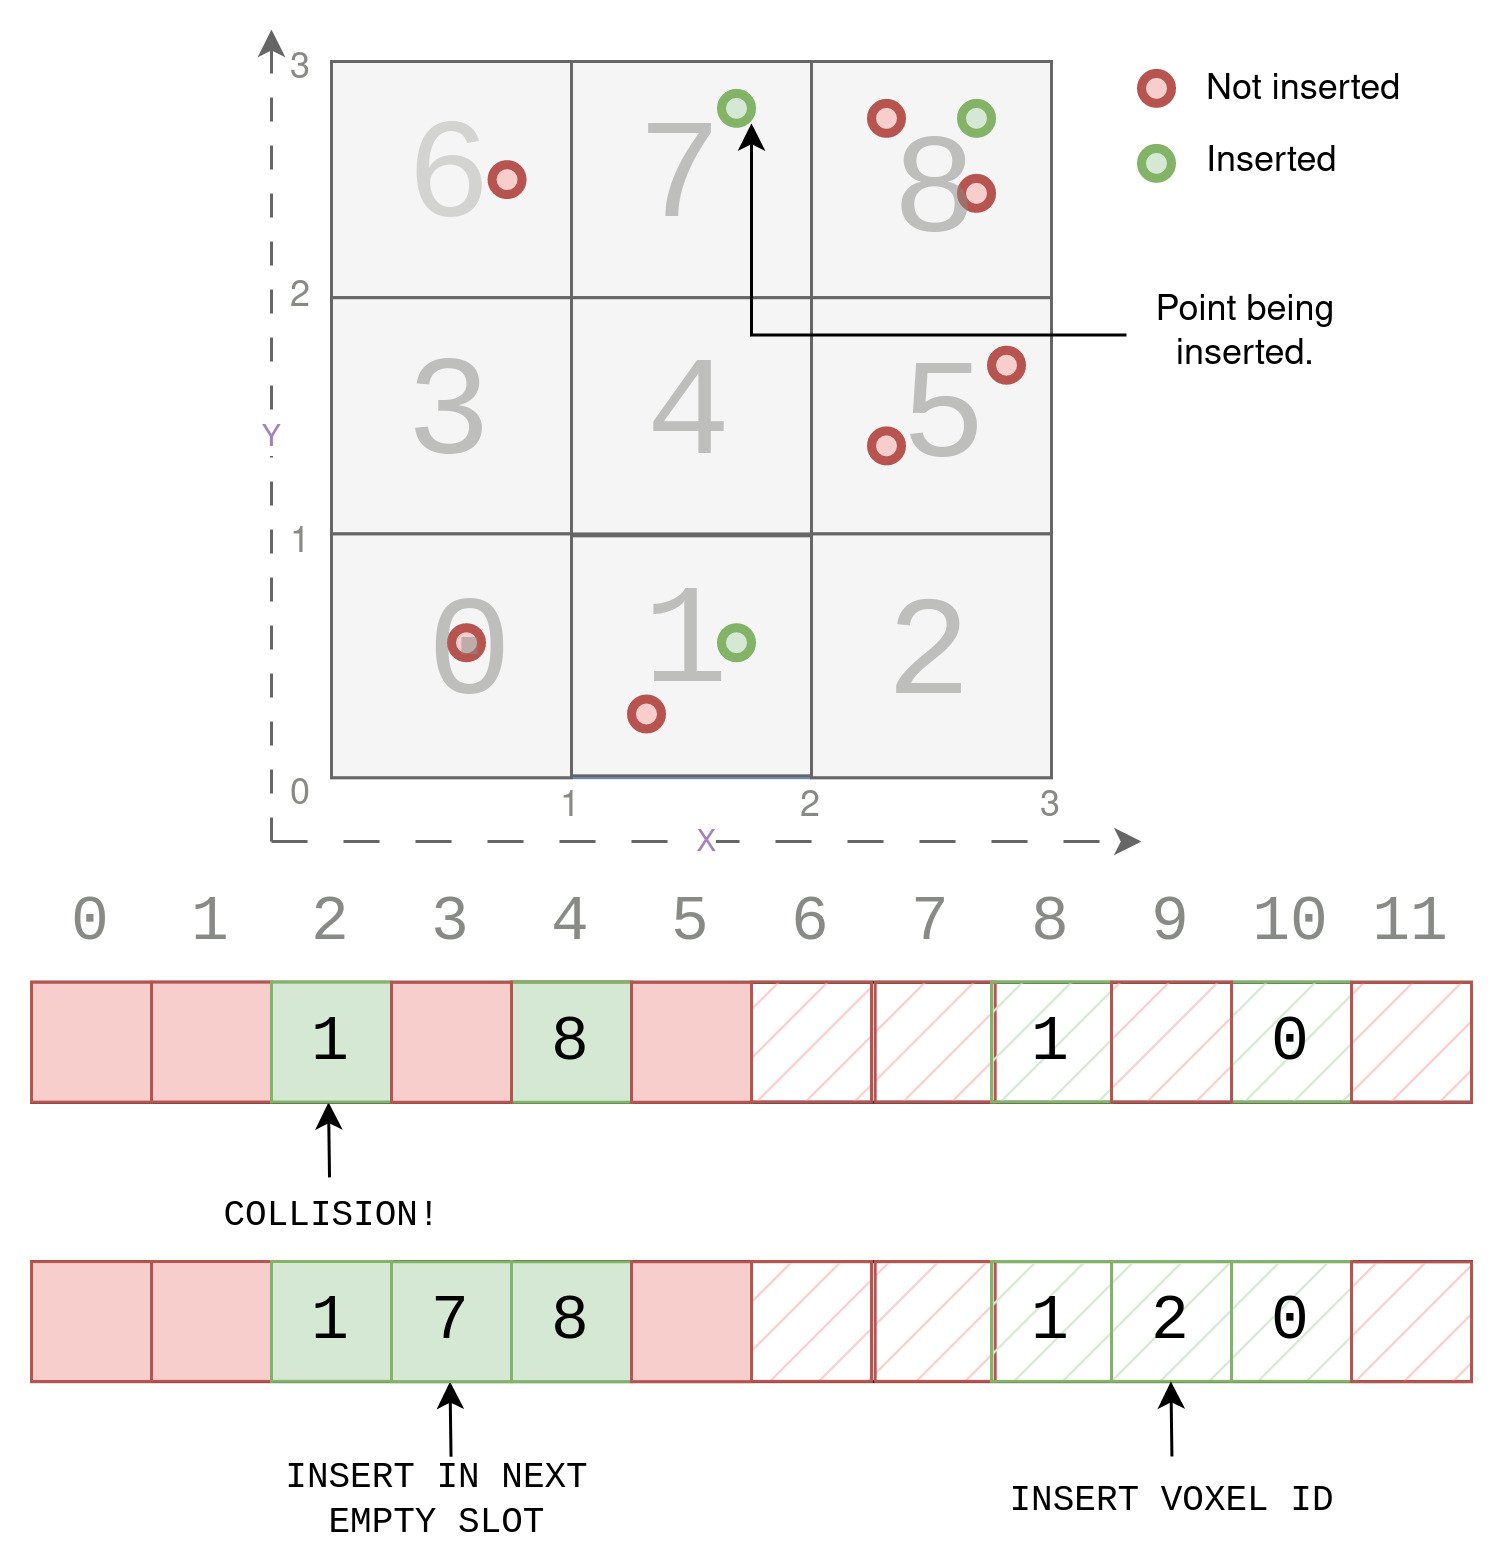
INSERTION 3 : Pt(1.7,2.8)

/*Collision Case wherein the slot computed uusing hash key is already filled
 up by a different key. In this case, insert the key in the next free slot. */

Step 1 : Voxel Computation
voxel_x = floor(1.7) = 1
voxel_y = floor(2.8) = 2
voxel_offset = (voxel_y * size_y) + voxel_x = 2*3 + 1 = 7
key = voxel_offset

Step 2 : Hashing of key
hash_key = hash(key) = key*2 =  7*2 = 14.

Step 3 : Find Slot using Modulus
slot = hash_key%(hash_size/2) = 14%6 = 2

Step 4 : Compare And Swap
value = total_voxels = 2
// collision case
hash_table[slot]!= Empty && hash_table[slot] != voxel_offset
// insert in next slot ( if free)
hash_table[++slot] = key
hash_table[slot+hash_size/2] = value
total_voxel++
Now we look at a more interesting example where the slot computed using the modulus of the hashed key is already present in the hash table. So a collision occurs, because the slot is already filled up by a different key. We look at this case while trying to insert a Point (1.7,2.8). In such a case of collision, we simply insert the key in the next free slot, which in this case is slot (3), as shown below.
Example 4
Psuedo Code : Example 4

INSERTION 4 : Pt(1.8,0.5)

/* Already inserted case where the slot for the given key is not emppty.
 No insertion happens, since slot already has same key. */

Step 1 : Voxel Computation
voxel_x = floor(1.8) = 1
voxel_y = floor(0.5) = 0
voxel_offset = (voxel_y * size_y) + voxel_x = 0*3 + 1 = 1
key = voxel_offset

Step 2 : Hashing of key
hash_key = hash(key) = key*2  = 1*2 = 2.

Step 3 : Find Slot using Modulus
slot = hash_key%(hash_size/2) = 2%6 = 2

Step 4 : Compare And Swap
value = total_voxels = 3.
// already inserted case
hash_table[slot] != Empty && hash_table[slot] == key
// no insertion.
As seen in the figure below, we skip insertion, at the computed slot 2, because it already had the current points key 1. The goal is to only store unique voxel_offset as key and the number of such unique voxels as values. Since this voxel_offset has already been inserted in the hash table and is not unique, we simply skip insertion.
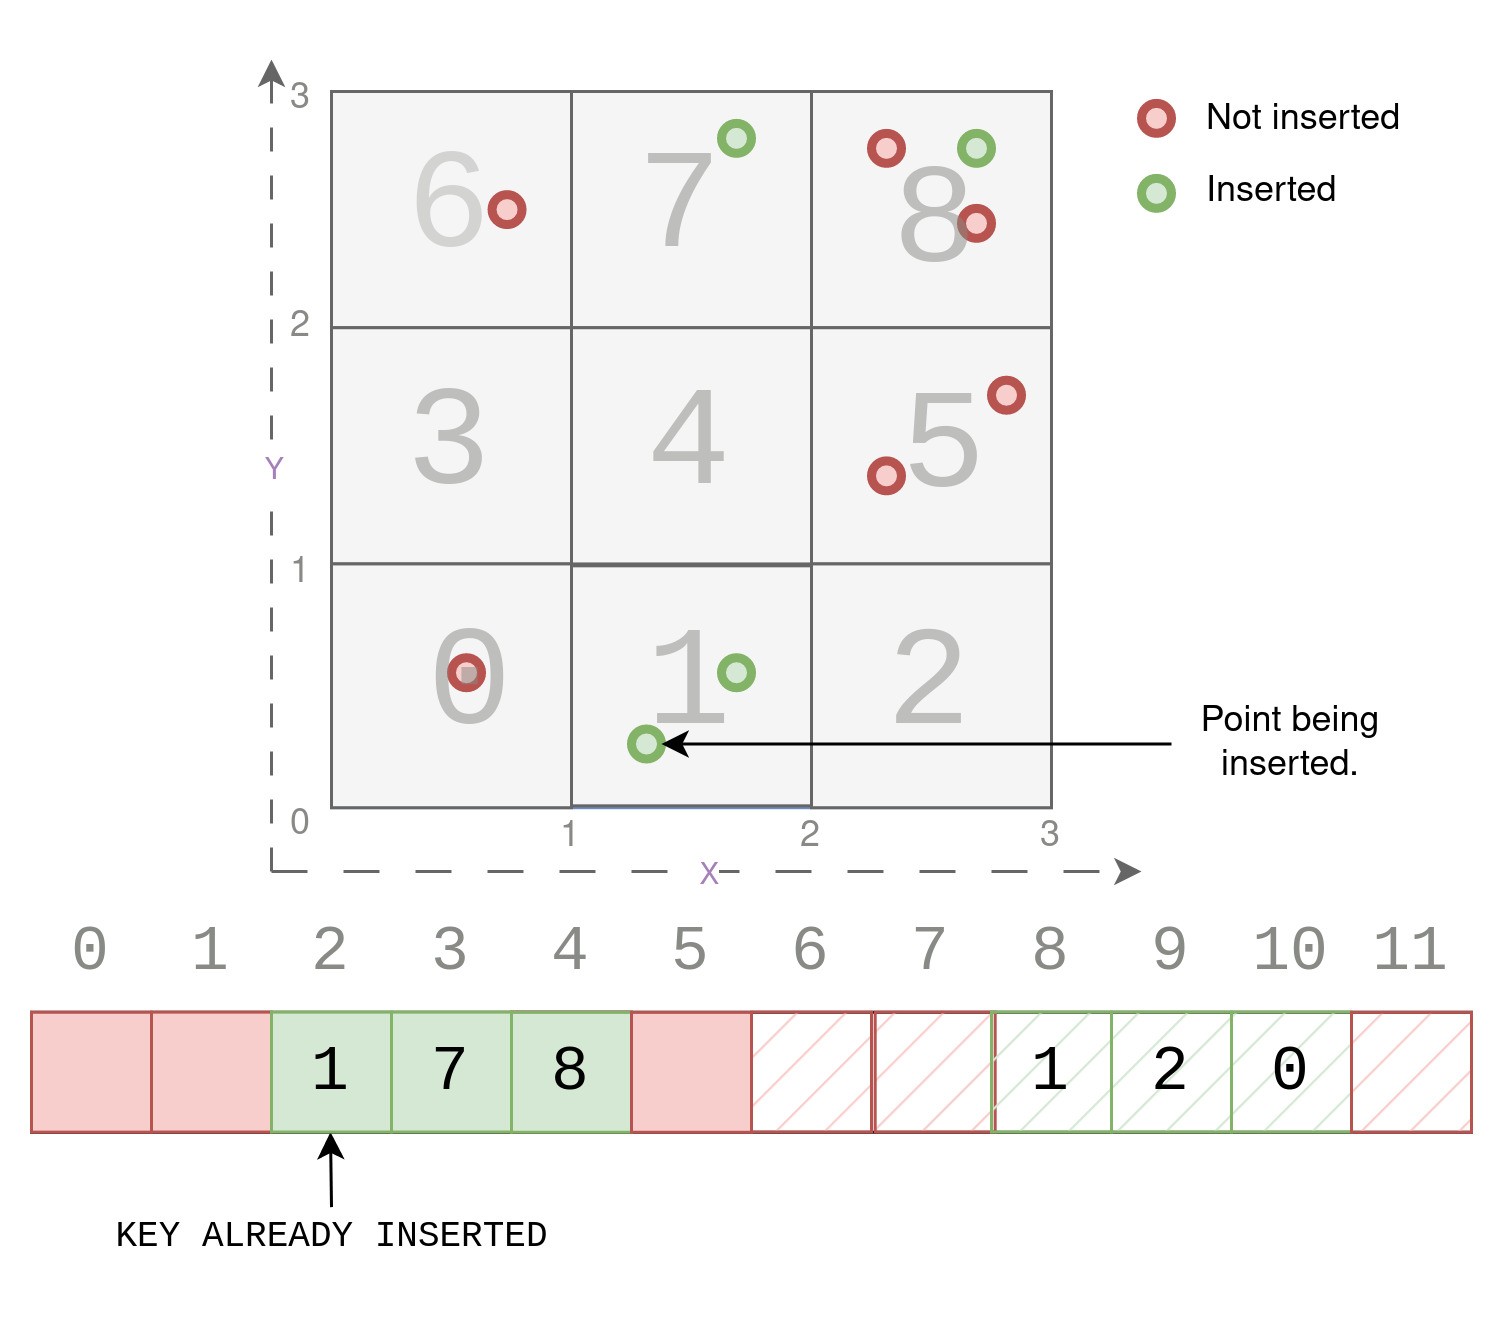
After successfully completing the hash insertion step, we have effectively built a hash table that stores the voxel_offset (representing the flattened voxel position) as keys and the corresponding voxel_ID as values. The voxel_ID is an indicator of the total number of unique voxels, which is updated as we encounter new unique voxels during the hash table construction process. This data structure offers two significant advantages. Firstly, it allows us to process only those voxels that contain points, thereby optimizing our further steps. Additionally, the process of mapping a point to its respective voxel becomes a constant-time operation O(1) due to the efficient key searching capability of the hash table. This constant-time retrieval is significantly faster compared to traditional “dictionary(map)” structures, which involve O(log(n)) time complexity for key searches.
B. Voxelization

Having accomplished the challenging task of creating the hash table, we now move on to the second step: “Voxelization.” In this step, we utilize the hash table to efficiently store information of all points from the same voxel in contiguous memory locations. The objective is to construct an array called voxel_temp with a size of (max_voxels * max_points_per_voxel * num_features), where all point features for each voxel are stored serially. Points belonging to the same voxel are grouped together in memory, thereby optimizing data access and manipulation. If a voxel contains lesser points than max_points_per_voxel, then those memory locations are left empty. No points for guessing, that these operations are performed in parallel for every point on a seperate thread. We simplify the process by breaking it down into three logical steps.
-
Compute Voxel Offset from Point For each point, we determine the corresponding
voxel_offsetas described earlier, using theflooroperation. Thevoxel_offsetrepresents a unique identifier for a specific voxel in our 2D grid. -
Efficiently Find Voxel ID from the Hash Table To quickly locate the voxel’s position in the array, we leverage the previously constructed hash table. Using the
voxel_offsetas the key, we perform a constant-time search in the hash table to find the correspondingvalue, which represents the uniquevoxel_ID. The intuition is that while making the hash table, the voxel that was identified first will be entered first in thevoxel_temparray. Sovoxel_IDessentially provides us this voxel’s location in thevoxel_temparray. -
Store Point Features in the Voxel Array With the
voxel_IDin hand, we efficiently store the point’s features in thevoxel_temparray. This array is designed to hold all the point features for every voxel in a serialized manner, ensuring that points from the same voxel are stored together. We use thevoxel_IDto determine the correct position in the array to store this point’s features, allowing us to efficiently group all points for each voxel.
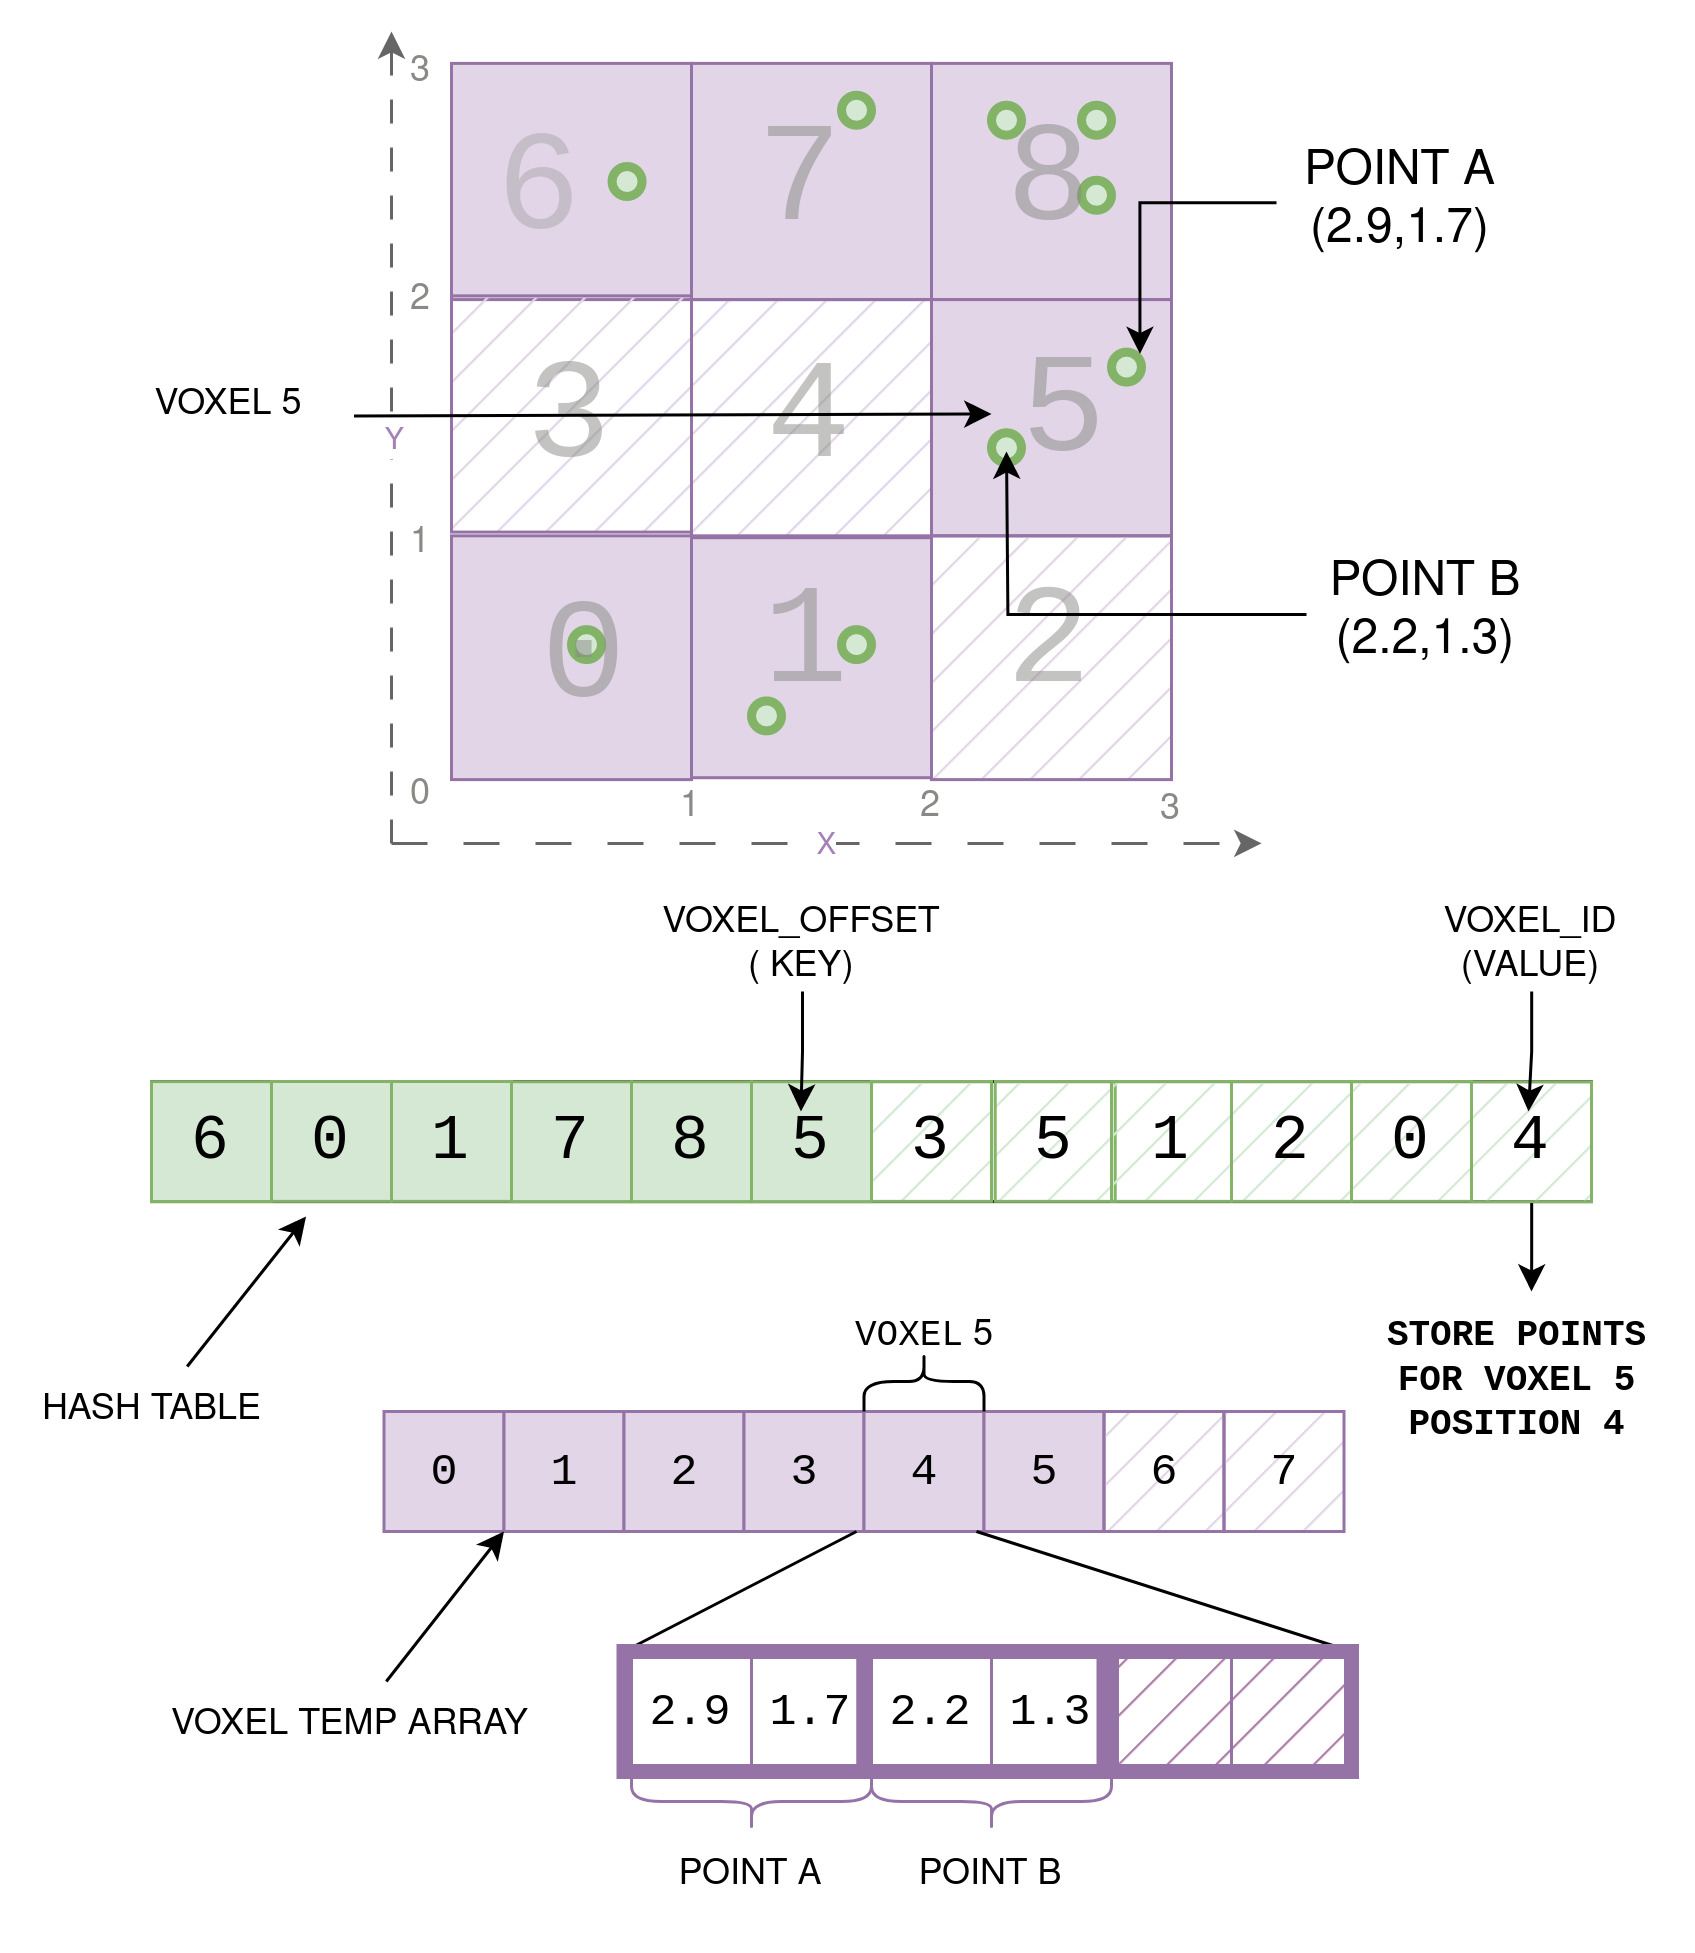
Let’s dive into an example to better understand the Voxelization process. Consider our 3x3 grid, and we have two points: Point A(2.9, 1.7) and Point B(2.2, 1.3).
Step 1: Compute Voxel Offset from Points
- For Point A, we calculate the voxel offset by considering its position in the grid.
- As Point A falls within the voxel at (2, 1), the voxel offset for Point A becomes 5.
- Similarly, for Point B, the voxel offset is also 5 as it belongs to the same voxel.

Step 2: Find Voxel ID from the Hash Table
- We refer to our previously constructed hash table to quickly determine the voxel_ID
  associated with voxel_offset 5.
- Upon checking the hash table, we find that the value corresponding to the key 5 is 4
- This indicates that this voxel has been assigned voxel ID 4.

Step 3: Store Point Features in the Voxel Temp Array
- Now that we have the voxel ID (4), we store the point features of Point A and Point B
  in the voxel_temp array at the 4th position.
- The voxel_temp array contains information about all points for each voxel,
  ensuring that points within the same voxel are grouped together.
- Since max_points_per_voxel in our example is 3, but this voxel has only 2 points, we keep
  the remaining space empty.
In the accompanying Figure above, we visually depict this process. We show the 3x3 grid, with Point A and Point B marked inside the voxel they belong to. Next, we present the hash map, where we highlight voxel_offset (5) and voxel_id (4) to showcase how they are linked. Subsequently, we display the voxel_temp array, with 6 voxels filled up since only 6 of the 9 voxels in our 3x3 grid have points. Finally, we zoom into the voxel with voxel_id 4 to witness the two points, A and B, stored serially in this array with their respective (x,y) values.
This example helps illustrate how the Voxelization process organizes point data efficiently, grouping all points belonging to each voxel together, thanks to the hash map’s guidance. This method significantly speeds up access and processing of point cloud data, making voxel-based approaches highly effective for a wide range of applications.
In summary, after completing the Voxelization step, we achieve an organized arrangement where all points belonging to each voxel are conveniently stored together. The hash table plays a key role, acting as a guide that allows us to locate each voxel’s position in the array with ease.
C. Feature extraction
In the final step of our voxelization process, known as Feature Extraction, we aim to extract meaningful information from the voxel_temp array, which contains all point features grouped by their respective voxel_IDs. The goal is to compute average feature values for each voxel and store them in a voxel_features array. In the feature extraction step, since we are operating on the voxel level ( and not on point level ), we assign one thread for every voxel and perform all operations for every voxel in parallel using CUDA.
-
Prepare for Feature Extraction The feature extraction process operates on a per-voxel basis, where each voxel’s features are processed independently. To begin, we initialize the
num_points_per_voxelarray to keep track of the number of points in each voxel. Then, for each voxel, we iterate over its points to calculate the total number of points and update the corresponding entry in thenum_points_per_voxelarray. -
Calculate Average Feature Values Next, we calculate the average feature values for each voxel. Starting with the first point in the
voxel_temparray for a given voxel, we compute the offset to access this voxel’s data in the array. For subsequent points within the same voxel, we iterate over all features (e.g., x, y, z, intensity, time) and sum up their values. -
Update Voxel Features After summing up the features for all points within the voxel, we calculate the average by dividing the sum by the total number of points in that voxel. These averaged feature values are then updated in the
voxel_featuresarray at the position corresponding to thevoxel_ID.
In summary, the Feature Extraction step processes voxel_temp data to calculate the average feature values for each voxel. This process is performed in parallel for all voxels, utilizing one thread per voxel. By the end of this step, the voxel_features array holds crucial information about each voxel’s characteristics in continuous memory, ready for further analysis and applications in point cloud processing. Each voxel’s information is stored in the voxel_features array at the position given by voxel_ID. For example we see feature extraction for the voxel at position 4 as shown in the Figure below.
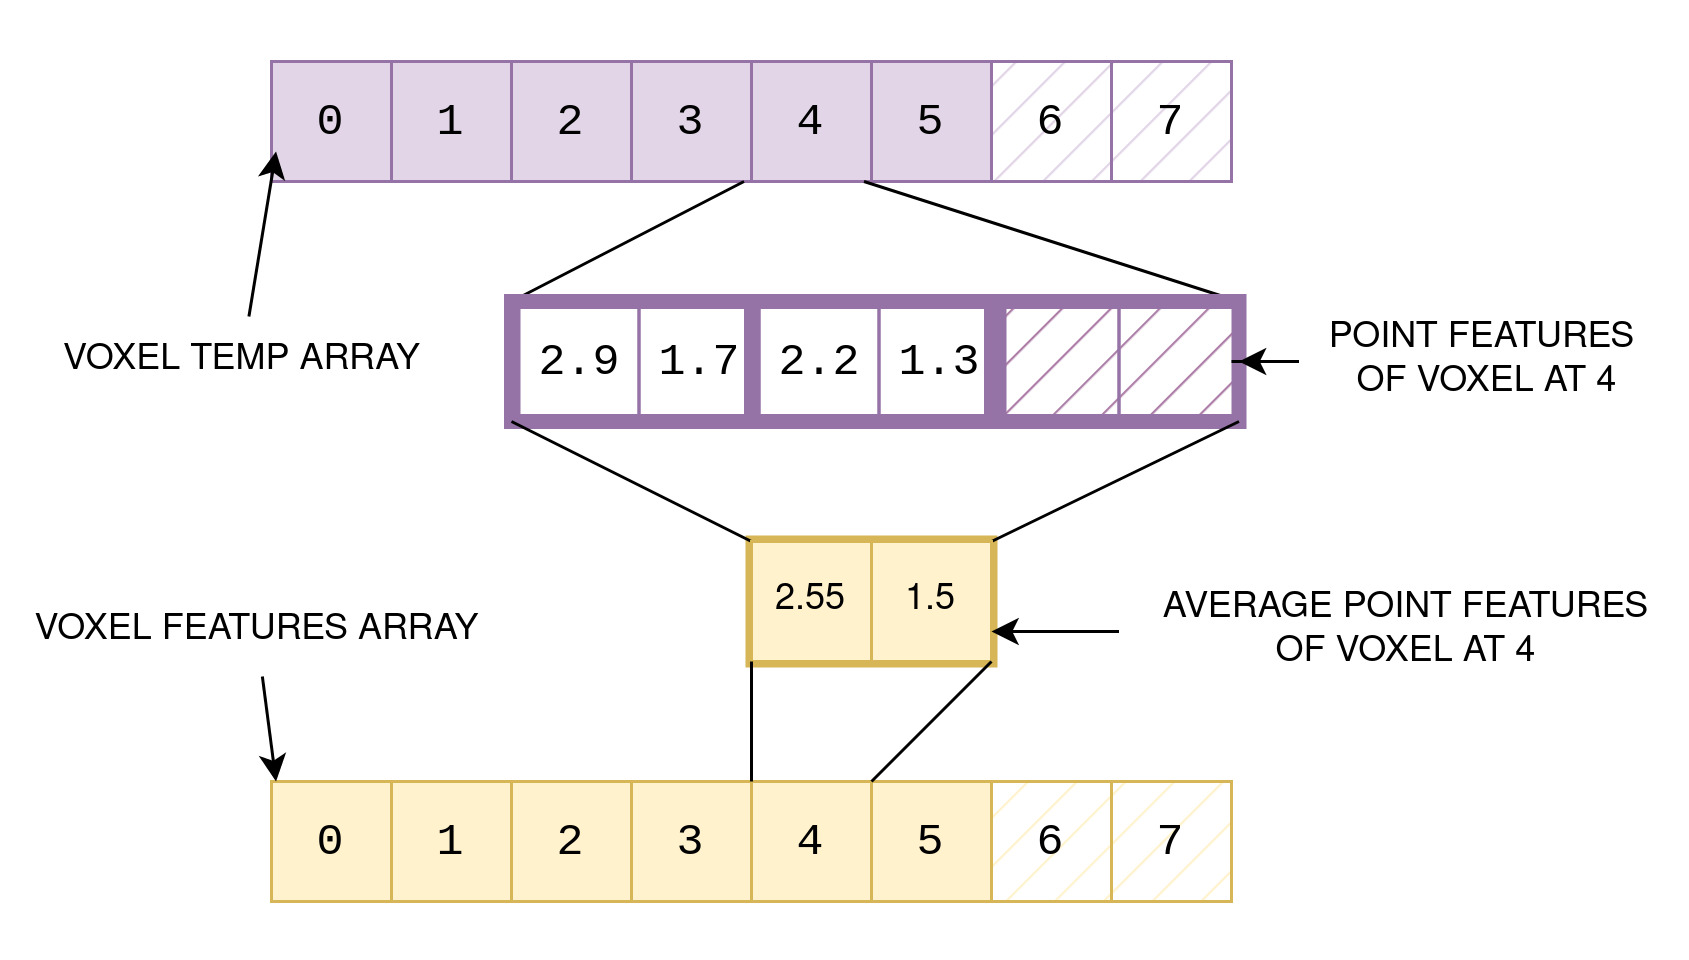
Voxel Feature Extraction for Voxel at Position 4

1. Prepare for Feature Extraction:
   We first initialize the num_points_per_voxel array to keep
   track of the number of points in each voxel.
   For the voxel at position 4, num_points_per_voxel[4] = 2, as it contains two points.

2. Calculate Average Feature Values:
   We now iterate over the points in the voxel_temp array
   for the voxel at position 4.Let's consider the features x and y
   for this example.

   Iteration 1:
   - Point A: x = 2.9, y = 1.7
   - Sum of x = 2.9, Sum of y = 1.7

   Iteration 2:
   - Point B: x = 2.2, y = 1.3
   - Sum of x = 2.9 + 2.2 = 5.1, Sum of y = 1.7 + 1.3 = 3.0

3. Update Voxel Features:
   After iterating through all points in the voxel, we have the
   sums of x and y for each feature.Now, we calculate the average by dividing
   the sum by the total number of points in the voxel (num_points_per_voxel[4] = 2).

   - Average x = 5.1 / 2 = 2.55
   - Average y = 3.0 / 2 = 1.5

   Finally, we update the voxel_features array for the voxel at position 4 with
   the calculated average feature values: voxel_features[4] = (2.55, 1.5)
4. Inside the Code
In this section, we will take a comprehensive look at the CUDA-powered voxelization implementation. We’ll dissect the code, step by step, to understand the magic behind its blazing-fast performance. To begin our exploration, let’s first setup and build the project locally and run the executable to see the CPU vs GPU performance. Then, we examine the folder structure that forms the foundation of this efficient voxelization engine. Understanding the organization of the code will serve as a solid starting point to grasp the inner workings of CUDA and its pivotal role in accelerating the voxelization process. So, let’s embark on this informative journey and unravel the secrets behind this powerful technique.
4.1 Setting up Locally
Before diving into the code, let’s set up the project locally by following these steps: Setup Project Locally:
- Install CUDA > 11.1.
- Ensure you are using Ubuntu > 18.04.
- Add CUDA path to
PATHandLD_LIBRARY_PATH. - OPTIONAL : PCL > 1.8.1 ( Only for visualization)
Now, let’s build and run the project with the provided commands:
git clone https://github.com/sanket-pixel/voxelize-cuda
cd voxelize-cuda
mkdir build && cd build
cmake ..
make
./voxelize_cuda ../data/test/ --cpu
You can expect an output similar to this:
GPU has cuda devices: 1
----device id: 0 info----
  GPU : GeForce RTX 2060
  Capbility: 7.5
  Global memory: 5912MB
  Const memory: 64KB
  SM in a block: 48KB
  warp size: 32
  threads in a block: 1024
  block dim: (1024,1024,64)
  grid dim: (2147483647,65535,65535)
-------------------------

Total 10
Average GPU Voxelization Time : 0.643269
Average CPU Voxelization Time : 374.432
Average GPU vs CPU Speedup : 582.076x times
To start the visualization, make sure the PCL Library is installed before building. Then execute with --visualize flag.
./voxelize_cuda ../data/test/ --visualize
Two windows will open up with titles Point Cloud Viewer and Voxel Cloud Viewer showing the original and voxelized point cloud respectively. Note that voxelized here means the point cloud after the feature extraction step. So the points represents the average of all points in each voxel.
To see detail logs of performance of every file, execute with --verbose flag.
./voxelize_cuda ../data/test/ --verbose
By default the executable will just perform CUDA based Voxelization on GPU. To also perform voxelization on the CPU, execute with the --cpu flag.
./voxelize_cuda ../data/test/ --cpu
This will show time comparisions of CPU and GPU.
Once you have obtained this output, you can take a cup of coffee, as we are now ready to deep dive into the code. Let’s explore the implementation in detail.
4.2. Folder structure
The project directory contains the following files and folders:
    ├── CMakeLists.txt
    ├── data
    │   └── test
    │       ├── pc1.bin
    │       └── pc2.bin
    |              .
    |              .
    |              .
    ├── include
    │   ├── common.h
    │   ├── kernel.h
    │   ├── visualizer.hpp
    │   ├── VoxelizerCPU.hpp
    │   └── VoxelizerGPU.h
    |
    ├── main.cpp
    ├── README.md
    └── src
        ├── preprocess_kernel.cu
        ├── visualizer.cpp
        ├── VoxelizerCPU.cpp
        └── VoxelizerGPU.cpp
- CMakeLists.txt - CMake configuration file for building the project
- data - Directory containing test data used in the project.
- test - Subdirectory containing binary data files.
- include - Directory containing header files.
- common.h - Header file with common definitions and macros.
- kernel.h - Header file with CUDA kernel function declarations.
- visualizer.hpp - Header file for Visualizer functions.
- VoxelizerCPU.hpp - Header file with CPU Voxelization functions
- VoxelizerGPU.h - Header file for the CUDA based Voxelization functions.
- main.cpp - Main C++ source file that orchestrates the voxelization process.
- README.md - Markdown file containing project documentation and information.
- src - Directory containing source files.
- preprocess_kernel.cu - CUDA source file with kernel implementations.
- visualizer.cpp - Visualization function implementations.
- VoxelizerCPU.cpp - CPU Voxelization function implementations.
- VoxelizerGPU.cpp - GPU Voxelization function implementations.
4.3 Code Walkthrough
The main entry point of the program is the main function in the main.cpp file. It starts by checking the command-line arguments and loading the point cloud data from the specified folder.
Step 1: Setup and Initialization
-
The
GetDeviceInfofunction is used to print information about the CUDA devices available on the system. -
The
getFolderFilefunction is used to get a list of files in the specified data folder with a “.bin” extension. -
The
loadDatafunction is used to load the binary data file into memory.
Step 2: Voxelization CPU
The CPU Voxelization is handled by the VoxelizerCPU class, defined in the VoxelizerCPU.h and VoxelizerCPU.cpp files. It performs Voxelization on CPU using standard C++ operations.
Step 3: Voxelization GPU
The CUDA based GPU Voxelization is handled by the VoxelizerGPU class, defined in the VoxelizerGPU.h and VoxelizerGPU.cpp files. It performs Voxelization on GPU using CUDA kernels for Hash Map Building, Voxelization and Feature Extraction.
A. Hash Map Building:
The hash map building is performed in the buildHashKernel CUDA kernel defined in the preprocess_kernel.cu file. This kernel takes the input point cloud data and converts it into voxel coordinates using the specified voxel size and range. It then builds a hash table that maps each voxel_offset to its corresponding voxel_ID.
B. Voxelization:
The voxelization is performed in the voxelizationKernel CUDA kernel, also defined in the preprocess_kernel.cu file. This kernel uses the hash table built in the previous step to assign each point to its corresponding voxel. It counts the number of points in each voxel and stores them in the num_points_per_voxel array. It also serializes the point features for each voxel in the voxels_temp array.
C. Feature Extraction:
The feature extraction is handled by the featureExtractionKernel CUDA kernel, also defined in the preprocess_kernel.cu file. This kernel takes the serialized point features in the voxels_temp array and computes the average feature values for each voxel. It stores the averaged features in the voxel_features array.
Step 4: Output and Cleanup
After the Voxelization GPU is complete for all the input files, the program outputs the results and frees the allocated memory.
4.4 Deep Dive
Now that we have taken a closer look at the basic walkthrough of the code, let’s embark on a more comprehensive deep dive, exploring the intricacies of the CUDA kernels and delving into the inner workings of the preprocessor class. We will gradually progress from the core CUDA kernel, which handles the voxelization process efficiently through parallelism, to the preprocessor class, where these kernels are utilized. Finally, we will uncover how the main cpp file leverages the functionalities of the preprocessor class to apply voxelization on the input point cloud data, culminating in the generation of 3D voxels. This step-by-step approach will allow us to understand how each component contributes to the overall process and how they interact harmoniously to produce the desired output. So, let’s begin our journey from inside to out, unraveling the complexities of the code and gaining a deeper understanding of its functioning.
1. CUDA Kernel for Building HashTables
The buildHashKernel is a CUDA kernel that performs the hash table building process. It takes the input point cloud data (points) and converts each point into voxel coordinates based on the specified voxel size and range. Then, it calls the insertHashTable function to insert each voxel offset as a key into the hash table, and the real_voxel_num variable is updated to keep track of the number of unique voxels in the hash table. The buildHashKernel function is executed by multiple CUDA threads in parallel, each processing a different point from the input point cloud. As a result, the hash table is efficiently built using GPU parallelism, and each voxel offset is uniquely assigned to an entry in the hash table.
__global__ void buildHashKernel(const float *points, size_t points_size,
        float min_x_range, float max_x_range,
        float min_y_range, float max_y_range,
        float min_z_range, float max_z_range,
        float voxel_x_size, float voxel_y_size, float voxel_z_size,
        int grid_y_size, int grid_x_size, int feature_num,
	unsigned int *hash_table, unsigned int *real_voxel_num) {
  int point_idx = blockIdx.x * blockDim.x + threadIdx.x;
  if (point_idx >= points_size) {
    return;
  }

  float px = points[feature_num * point_idx];
  float py = points[feature_num * point_idx + 1];
  float pz = points[feature_num * point_idx + 2];

  if( px < min_x_range || px >= max_x_range || py < min_y_range || py >= max_y_range
    || pz < min_z_range || pz >= max_z_range) {
    return;
  }

  unsigned int voxel_idx = floorf((px - min_x_range) / voxel_x_size);
  unsigned int voxel_idy = floorf((py - min_y_range) / voxel_y_size);
  unsigned int voxel_idz = floorf((pz - min_z_range) / voxel_z_size);
  unsigned int voxel_offset = voxel_idz * grid_y_size * grid_x_size
	                    + voxel_idy * grid_x_size
                            + voxel_idx;
  insertHashTable(voxel_offset, real_voxel_num, points_size * 2 * 2, hash_table);
}
Here’s how the buildHashKernel works:
-
__global__ void buildHashKernel(...): This line defines thebuildHashKernelfunction as a CUDA kernel using the__global__function modifier. As a kernel, this function will be executed in parallel by multiple threads on the GPU. -
int point_idx = blockIdx.x * blockDim.x + threadIdx.x: This line calculates the index of the current point to be processed by the CUDA thread. -
if (point_idx >= points_size) { return; }: This condition checks if the thread index is out of bounds (i.e., beyond the number of points in the input points array). If so, the thread returns early to avoid processing invalid data. -
float px = points[feature_num * point_idx]; ...: These lines extract the X, Y, and Z coordinates of the current point from the input points array based on thefeature_num(the number of features per point). -
if (px < min_x_range \|\| px >= max_x_range \|\| ...: This condition checks if the current point lies within the specified 3D range (min/max X, Y, Z). If the point is outside this range, it is not considered for voxelization, and the thread returns early. -
unsigned int voxel_idx = floorf((px - min_x_range) / voxel_x_size); ...: These lines calculate the voxel coordinates (voxel_idx,voxel_idy,voxel_idz) corresponding to the current point’s X, Y, and Z coordinates based on the specified voxel sizes and ranges. -
unsigned int voxel_offset = voxel_idz * grid_y_size * grid_x_size ...: This line calculates thevoxel_offsetbased on the voxel coordinates. Thevoxel_offsetis a flattened index for each voxel within the 3D grid. -
insertHashTable(voxel_offset, real_voxel_num, points_size * 2 * 2, hash_table);: This line calls theinsertHashTablefunction to insert the currentvoxel_offsetinto the hash table. It also updates thereal_voxel_numvariable using theatomicAddfunction to keep track of the number of unique voxels added to the hash table.
2. Inserting into HashTable
Next, let’s move on to the insertHashTable function:
// Function to insert a key-value pair into the hash table
__device__ inline void insertHashTable(const uint32_t key, uint32_t *value,
		const uint32_t hash_size, uint32_t *hash_table) {
  uint64_t hash_value = hash(key);
  uint32_t slot = hash_value % (hash_size / 2)/*key, value*/;
  uint32_t empty_key = UINT32_MAX;
  while (true) {
    uint32_t pre_key = atomicCAS(hash_table + slot, empty_key, key);
    if (pre_key == empty_key) {
      hash_table[slot + hash_size / 2 /*offset*/] = atomicAdd(value, 1);
      break;
    } else if (pre_key == key) {
      break;
    }
    slot = (slot + 1) % (hash_size / 2);
  }
}
Explanation:
The insertHashTable function is responsible for inserting a key-value pair into the hash table. It uses the previously explained hash function to compute the hash value of the key, and then it resolves hash collisions using a technique called linear probing.
Here’s how the insertHashTable function works:
-
uint64_t hash_value = hash(key): This line computes the hash value of the inputkeyusing thehashfunction. -
uint32_t slot = hash_value % (hash_size / 2): This line calculates the initial slot index in the hash table by taking the modulo of the hash value with half of the hash table size. This ensures that the slot index is within the valid range of the hash table. -
uint32_t empty_key = UINT32_MAX: This line sets theempty_keyvariable to the maximum value of a 32-bit unsigned integer. This value is used to indicate an empty slot in the hash table. -
while (true) { ... }: This is a loop that continues until the key is successfully inserted into the hash table. It handles hash collisions using linear probing. -
uint32_t pre_key = atomicCAS(hash_table + slot, empty_key, key): This line performs an atomic compare-and-swap operation (CAS) on the hash table. It checks if the slot at the current index (slot) is empty (i.e., containsempty_key). If it is empty, it atomically swaps the value with the inputkey, effectively inserting the key into the hash table. -
if (pre_key == empty_key) { ... }: This condition checks if the CAS operation was successful, indicating that the key was inserted into the hash table. If successful, the function proceeds to update the offset in the hash table for the corresponding value (used in feature extraction). -
hash_table[slot + hash_size / 2 /*offset*/] = atomicAdd(value, 1): This line atomically increments the value in the hash table at the offsetslot + hash_size / 2, effectively storing the value for the given key. TheatomicAddfunction ensures that multiple threads trying to insert the same key concurrently will get unique values. -
else if (pre_key == key) { ... }: This condition handles the case when the slot already contains the same key (a duplicate). In this case, the function breaks out of the loop, as there’s no need to insert the key again. -
slot = (slot + 1) % (hash_size / 2): This line updates the slot index using linear probing by incrementing it by 1 and wrapping around to the beginning if it exceeds half of the hash table size.
The insertHashTable function plays a crucial role in building the hash table, which is later used in voxelization and feature extraction.
3. Hash Function
Sure, let’s start by explaining the base function, which is the hash function:
// Hash function for generating a 64-bit hash value
__device__ inline uint64_t hash(uint64_t k) {
  k ^= k >> 16;
  k *= 0x85ebca6b;
  k ^= k >> 13;
  k *= 0xc2b2ae35;
  k ^= k >> 16;
  return k;
}
Explanation:
The hash function is a simple hash function that takes a 64-bit integer k as input and generates a 64-bit hash value using bitwise operations and multiplication with constants.
Here’s how the hash function works:
-
k ^= k >> 16: This line performs a bitwise XOR operation betweenkandkright-shifted by 16 bits. This step introduces a level of randomness to the bits. -
k *= 0x85ebca6b: This line multiplieskby a constant value (0x85ebca6b). Multiplication helps in spreading out the bits and reducing collisions. -
k ^= k >> 13: This line again performs a bitwise XOR operation betweenkandkright-shifted by 13 bits. This step further increases the randomness of the bits. -
k *= 0xc2b2ae35: This line multiplieskby another constant value (0xc2b2ae35) to spread out the bits even more. -
k ^= k >> 16: Finally, this line performs a bitwise XOR operation betweenkandkright-shifted by 16 bits. This step is the last step of mixing the bits to produce the final hash value.
The hash function is used in the hash table building process to generate unique hash values for the voxel offsets in the point cloud data.
4. Voxelization Kernel
In the voxelizationKernel CUDA kernel, each thread processes an individual point from the input point cloud. The goal of this function is to efficiently convert the points into their corresponding 3D voxel representations. It first calculates the voxel coordinates for each point based on the specified voxel sizes and ranges. Then, it uses a hash table lookup to find the corresponding voxel ID for each voxel offset. If the voxel ID is within the specified maximum number of voxels, the function atomically adds the point to the voxel and updates the voxel indices accordingly. This ensures a fast and optimized voxelization process for large and sparse point clouds.
__global__ void voxelizationKernel(const float *points, size_t points_size,
                                   float min_x_range, float max_x_range,
                                   float min_y_range, float max_y_range,
                                   float min_z_range, float max_z_range,
                                   float voxel_x_size, float voxel_y_size, float voxel_z_size,
                                   int grid_y_size, int grid_x_size, int feature_num, int max_voxels,
                                   int max_points_per_voxel,
                                   unsigned int *hash_table, unsigned int *num_points_per_voxel,
                                   float *voxels_temp, unsigned int *voxel_indices, unsigned int *real_voxel_num) {

  // give every point to a thread. Find the index of the current point within this kernel.
  int point_idx = blockIdx.x * blockDim.x + threadIdx.x;
  if (point_idx >= points_size) {
    return;
  }

  // points is the array of points in the point cloud storing point features (x, y, z, intensity, t)
  // in a serialized format. We access px, py, pz of this point now.
  // feature_num is 5, representing the number of features per point.
  float px = points[feature_num * point_idx];
  float py = points[feature_num * point_idx + 1];
  float pz = points[feature_num * point_idx + 2];

  // If the point is outside the range along the (x, y, z) dimensions, stop further
  // processing and return.
  if (px < min_x_range || px >= max_x_range || py < min_y_range || py >= max_y_range
    || pz < min_z_range || pz >= max_z_range) {
    return;
  }

  // Now find the voxel id for this point using the usual voxel conversion logic.
  unsigned int voxel_idx = floorf((px - min_x_range) / voxel_x_size);
  unsigned int voxel_idy = floorf((py - min_y_range) / voxel_y_size);
  unsigned int voxel_idz = floorf((pz - min_z_range) / voxel_z_size);
  // Now find the voxel offset, which is the index of the voxel if all voxels are flattened.
  unsigned int voxel_offset = voxel_idz * grid_y_size * grid_x_size
                            + voxel_idy * grid_x_size
                            + voxel_idx;
  // We perform a scatter operation to voxels, and the result is stored in 'voxel_id'.
  unsigned int voxel_id = lookupHashTable(voxel_offset, points_size * 2 * 2, hash_table);
  // If the current voxel id is greater than max_voxels, simply return.
  if (voxel_id >= max_voxels) {
    return;
  }

  // With the voxel id, we can now atomically increment the counter for the number of points in the voxel.
  unsigned int current_num = atomicAdd(num_points_per_voxel + voxel_id, 1);

  // If the current number of points in the voxel exceeds the maximum allowed points per voxel, we return.
  if (current_num >= max_points_per_voxel) {
    return;
  }

  // Now we can proceed to add the current point to the voxel's feature list.
  // Calculate the destination offset where the point's features will be stored in the voxels_temp array.
  unsigned int dst_offset = voxel_id * (feature_num * max_points_per_voxel) + current_num * feature_num;
  // Calculate the source offset of the current point's features in the points array.
  unsigned int src_offset = point_idx * feature_num;

  // Copy the point's features from the points array to the corresponding location in the voxels_temp array.
  // This effectively adds the point's features to the voxel's feature list.
  for (int feature_idx = 0; feature_idx < feature_num; ++feature_idx) {
    voxels_temp[dst_offset + feature_idx] = points[src_offset + feature_idx];
  }

  // Store additional information about the voxel (its indices along X, Y, Z axes) for later processing.
  uint4 idx = {0, voxel_idz, voxel_idy, voxel_idx};
  ((uint4 *)voxel_indices)[voxel_id] = idx;

}
Explanation:
Here’s how the voxelizationKernel works:
-
int point_idx = blockIdx.x * blockDim.x + threadIdx.x;: This line calculates the index of the current point to be processed by the CUDA thread. -
if (point_idx >= points_size) { return; }: This condition checks if the thread index is out of bounds, i.e., beyond the number of points in the input points array. If so, the thread returns early to avoid processing invalid data. -
float px = points[feature_num * point_idx]; float py = points[feature_num * point_idx + 1]; float pz = points[feature_num * point_idx + 2];: These lines extract the X, Y, and Z coordinates of the current point from the input points array based on thefeature_num(the number of features per point). -
if (px < min_x_range || px >= max_x_range || py < min_y_range || py >= max_y_range || pz < min_z_range || pz >= max_z_range) { return; }: This condition checks if the current point lies within the specified 3D range (min/max X, Y, Z). If the point is outside this range, it is not considered for voxelization, and the thread returns early. -
unsigned int voxel_idx = floorf((px - min_x_range) / voxel_x_size); unsigned int voxel_idy = floorf((py - min_y_range) / voxel_y_size); unsigned int voxel_idz = floorf((pz - min_z_range) / voxel_z_size);: These lines calculate the voxel coordinates (voxel_idx,voxel_idy,voxel_idz) corresponding to the current point’s X, Y, and Z coordinates based on the specified voxel sizes and ranges. -
unsigned int voxel_offset = voxel_idz * grid_y_size * grid_x_size + voxel_idy * grid_x_size + voxel_idx;: This line calculates the voxel offset based on the voxel coordinates. The voxel offset is a unique identifier for each voxel within the 3D grid. -
unsigned int voxel_id = lookupHashTable(voxel_offset, points_size * 2 * 2, hash_table);: This line calls thelookupHashTablefunction to find the corresponding voxel ID for the current voxel offset using the hash table. -
if (voxel_id >= max_voxels) { return; }: This condition checks if the current voxel ID is greater than or equal tomax_voxels, indicating that the maximum number of allowed voxels has been reached. If so, the thread returns early. -
unsigned int current_num = atomicAdd(num_points_per_voxel + voxel_id, 1);: This line uses theatomicAddfunction to atomically increment the number of points in the voxel represented byvoxel_idin thenum_points_per_voxelarray. -
if (current_num < max_points_per_voxel) { ... }: This condition checks if the current number of points in the voxel is less than the maximum allowed per voxel. If so, the thread proceeds to add the current point’s features to the voxel. -
unsigned int dst_offset = voxel_id * (feature_num * max_points_per_voxel) + current_num * feature_num; unsigned int src_offset = point_idx * feature_num;: These lines calculate the offsets for copying the current point’s features to the voxel in thevoxels_temparray. -
for (int feature_idx = 0; feature_idx < feature_num; ++feature_idx) { voxels_temp[dst_offset + feature_idx] = points[src_offset + feature_idx]; }: This loop copies the features of the current point to the appropriate location in thevoxels_temparray, effectively adding the point to the voxel. -
uint4 idx = {0, voxel_idz, voxel_idy, voxel_idx}; ((uint4 *)voxel_indices)[voxel_id] = idx;: These lines create an index vector (idx) containing information about the voxel’s position in the grid and store it in thevoxel_indicesarray at the location corresponding tovoxel_id. This allows quick lookup of voxel information during subsequent processing.
The voxelizationKernel efficiently assigns each point to its corresponding voxel, ensuring that points are appropriately added to the voxel’s feature list without exceeding the maximum allowed points per voxel.
5. Voxelization Launch
The voxelizationLaunch function is a key step in the voxelization process. It is responsible for launching two CUDA kernels: buildHashKernel and voxelizationKernel. Let’s break down the function and its components:
cudaError_t voxelizationLaunch(const float *points, size_t points_size, float min_x_range, float max_x_range,
                          float min_y_range, float max_y_range,float min_z_range, float max_z_range,
                          float voxel_x_size, float voxel_y_size, float voxel_z_size, int grid_y_size,
                          int grid_x_size, int feature_num, int max_voxels,int max_points_per_voxel,
                          unsigned int *hash_table, unsigned int *num_points_per_voxel,float *voxel_features,
                          unsigned int *voxel_indices,unsigned int *real_voxel_num, cudaStream_t stream)
      {
    // how many threads in each block
    int threadNum = THREADS_FOR_VOXEL;
    // how many blocks needed if each point gets on thread.
    dim3 blocks((points_size+threadNum-1)/threadNum);
    // how many threads in each block
    dim3 threads(threadNum);
    // how many blocks needed to launch the kernel, how many threads in each block,
    // how many bytes for dynamic shared memory  ( zero here), cuda stream
    buildHashKernel<<<blocks, threads, 0, stream>>>
      (points, points_size,
          min_x_range, max_x_range,
          min_y_range, max_y_range,
          min_z_range, max_z_range,
          voxel_x_size, voxel_y_size, voxel_z_size,
          grid_y_size, grid_x_size, feature_num, hash_table,
    real_voxel_num);
    voxelizationKernel<<<blocks, threads, 0, stream>>>
      (points, points_size,
          min_x_range, max_x_range,
          min_y_range, max_y_range,
          min_z_range, max_z_range,
          voxel_x_size, voxel_y_size, voxel_z_size,
          grid_y_size, grid_x_size, feature_num, max_voxels,
          max_points_per_voxel, hash_table,
    num_points_per_voxel, voxel_features, voxel_indices, real_voxel_num);
    cudaError_t err = cudaGetLastError();
    return err;
}
Explanation: Here’s how the voxelizationLaunch function works:
-
int threadNum = THREADS_FOR_VOXEL;: This line sets the number of threads per block for the CUDA kernel. The value is obtained from the constantTHREADS_FOR_VOXEL, which likely represents an optimal number of threads for efficient computation. -
dim3 blocks((points_size+threadNum-1)/threadNum);: This line calculates the number of blocks needed to launch the kernel based on the total number of points (points_size) and thethreadNum. It ensures that all points are processed by the threads efficiently. -
dim3 threads(threadNum);: This line sets the number of threads in each block based on the previously calculatedthreadNum. -
buildHashKernel<<<blocks, threads, 0, stream>>>(...): This line launches thebuildHashKernelCUDA kernel. It processes the input points to build the hash table, which maps voxel offsets to voxel IDs. -
voxelizationKernel<<<blocks, threads, 0, stream>>>(...): This line launches thevoxelizationKernelCUDA kernel. It voxelizes the input points based on the computed hash table, assigning points to corresponding voxels and storing the voxel features. -
cudaError_t err = cudaGetLastError(); return err;: These lines check for any errors that occurred during kernel launches. If there are any errors, they will be returned by the function, indicating a problem in the GPU computation.
The voxelizationLaunch function serves as the entry point to initiate the voxelization process on the GPU. It efficiently divides the data into blocks and threads, launches the necessary CUDA kernels (buildHashKernel and voxelizationKernel), and checks for any errors in the GPU computation. By effectively utilizing the GPU’s parallel processing capabilities, voxelization of large point clouds can be done efficiently and quickly.
Overall, the voxelizationLaunch function is a crucial step in the voxelization process, coordinating the parallel execution of the CUDA kernels to efficiently process and voxelate the input point cloud data.
6. Feature Extraction Kernel
__global__ void featureExtractionKernel(float *voxels_temp,
                                        unsigned int *num_points_per_voxel,
                                        int max_points_per_voxel, int feature_num, half *voxel_features) {
    int voxel_idx = blockIdx.x * blockDim.x + threadIdx.x;

    num_points_per_voxel[voxel_idx] = num_points_per_voxel[voxel_idx] > max_points_per_voxel ?
                                      max_points_per_voxel : num_points_per_voxel[voxel_idx];

    int valid_points_num = num_points_per_voxel[voxel_idx];

    int offset = voxel_idx * max_points_per_voxel * feature_num;

    for (int feature_idx = 0; feature_idx < feature_num; ++feature_idx) {
        for (int point_idx = 0; point_idx < valid_points_num - 1; ++point_idx) {
            voxels_temp[offset + feature_idx] += voxels_temp[offset + (point_idx + 1) * feature_num + feature_idx];
        }
        voxels_temp[offset + feature_idx] /= valid_points_num;
    }

    for (int feature_idx = 0; feature_idx < feature_num; ++feature_idx) {
        int dst_offset = voxel_idx * feature_num;
        int src_offset = voxel_idx * feature_num * max_points_per_voxel;
        voxel_features[dst_offset + feature_idx] = __float2half(voxels_temp[src_offset + feature_idx]);
    }
}
Here’s how the featureExtractionKernel works:
-
int voxel_idx = blockIdx.x * blockDim.x + threadIdx.x;: This line calculates the index of the current voxel to be processed by the CUDA thread. Each CUDA thread corresponds to one voxel, and thevoxel_idxuniquely identifies the voxel. -
num_points_per_voxel[voxel_idx] = num_points_per_voxel[voxel_idx] > max_points_per_voxel ? max_points_per_voxel : num_points_per_voxel[voxel_idx];: This line checks if the number of points in the current voxel exceeds themax_points_per_voxel. If it does, it clips the value to ensure that the feature extraction is performed on a maximum ofmax_points_per_voxelpoints for each voxel. -
int valid_points_num = num_points_per_voxel[voxel_idx];: This line retrieves the actual number of valid points in the current voxel, which may have been clipped in the previous step. -
int offset = voxel_idx * max_points_per_voxel * feature_num;: This line calculates the offset for accessing the voxel’s features in thevoxels_temparray. It represents the index from which the current voxel’s features start in thevoxels_temparray. -
The goal of feature extraction is to take the average for each feature (x, y, z, intensity, time) of every point in the voxel. The next few lines of code achieve this by iterating over each feature and each point in the voxel, summing up the feature values, and then dividing the sum by the number of valid points to obtain the average value.
-
for (int feature_idx = 0; feature_idx < feature_num; ++feature_idx) { ... }: This loop iterates over each feature (x, y, z, intensity, time) and calculates the average value for that feature in the current voxel. -
The next loop within the feature extraction loop iterates over each point in the voxel (
point_idx), starting from the second point (index 1) since the first point’s feature values were already added tovoxels_temp. -
The feature values of each point are added to the corresponding feature in
voxels_temp. After the loop,voxels_temp[offset + feature_idx]contains the sum of feature values for all points in the current voxel for the given feature. -
Finally, the sum for each feature is divided by the
valid_points_numto calculate the average feature value for the current voxel. This average feature value is then stored invoxels_tempin the same location where the sum was stored earlier. -
The next loop moves the averaged voxel features from
voxels_tempto thevoxel_featuresarray, ensuring that the features for each voxel are stored contiguously invoxel_features. The features are converted to the “half” data type (__float2half) for memory efficiency.
In summary, the featureExtractionKernel takes each voxel represented by a CUDA thread and calculates the average feature values (x, y, z, intensity, time) for all valid points in that voxel. The averaged voxel features are then stored in the voxel_features array, which represents the final output of the feature extraction process. The GPU’s parallel processing capabilities are utilized to efficiently perform this feature extraction on multiple voxels simultaneously, speeding up the overall computation for large point clouds.
7. Feature Extraction Launch
cudaError_t featureExtractionLaunch(float *voxels_temp, unsigned int *num_points_per_voxel,
        const unsigned int real_voxel_num, int max_points_per_voxel, int feature_num,
	half *voxel_features, cudaStream_t stream)
{
  int threadNum = THREADS_FOR_VOXEL;
  dim3 blocks((real_voxel_num + threadNum - 1) / threadNum);
  dim3 threads(threadNum);
  featureExtractionKernel<<<blocks, threads, 0, stream>>>
    (voxels_temp, num_points_per_voxel,
        max_points_per_voxel, feature_num, voxel_features);
  cudaError_t err = cudaGetLastError();
  return err;
}
The featureExtractionLaunch function is the launch function for the featureExtractionKernel, responsible for processing voxel data and extracting features. It takes the necessary input arrays, determines the block and thread configuration based on the number of voxels, launches the kernel, and captures any CUDA errors that might occur during execution.
8.Generate Voxels
This function in the VoxelizerGPU.cpp file is responsible for performing voxelization and feature extraction on a set of input points using CUDA on the GPU. Here’s how it works:
int VoxelizerGPU::generateVoxels(const float *points, size_t points_size, cudaStream_t stream)
{
    // flash memory for every run
    checkCudaErrors(cudaMemsetAsync(hash_table_, 0xff, hash_table_size_, stream));
    checkCudaErrors(cudaMemsetAsync(voxels_temp_, 0xff, voxels_temp_size_, stream));

    checkCudaErrors(cudaMemsetAsync(d_voxel_num_, 0, voxel_num_size_, stream));
    checkCudaErrors(cudaMemsetAsync(d_real_num_voxels_, 0, sizeof(unsigned int), stream));
    checkCudaErrors(cudaStreamSynchronize(stream));

    checkCudaErrors(voxelizationLaunch(points, points_size,
          params_.min_x_range, params_.max_x_range,
          params_.min_y_range, params_.max_y_range,
          params_.min_z_range, params_.max_z_range,
          params_.pillar_x_size, params_.pillar_y_size, params_.pillar_z_size,
          params_.getGridYSize(), params_.getGridXSize(), params_.feature_num, params_.max_voxels,
          params_.max_points_per_voxel, hash_table_,
    d_voxel_num_, /*d_voxel_features_*/voxels_temp_, d_voxel_indices_,
    d_real_num_voxels_, stream));
    checkCudaErrors(cudaMemcpyAsync(h_real_num_voxels_, d_real_num_voxels_, sizeof(int), cudaMemcpyDeviceToHost, stream));
    checkCudaErrors(cudaStreamSynchronize(stream));

    checkCudaErrors(featureExtractionLaunch(voxels_temp_, d_voxel_num_,
          *h_real_num_voxels_, params_.max_points_per_voxel, params_.feature_num,
    d_voxel_features_, stream));

    checkCudaErrors(cudaStreamSynchronize(stream));
    return 0;
}
-
Memory Initialization: The function starts by clearing the flash memory for each run. It uses
cudaMemsetAsyncto set thehash_table_andvoxels_temp_memory regions to 0xFF asynchronously. It also sets thed_voxel_num_andd_real_num_voxels_memory regions to 0 asynchronously. -
Voxelization: Next, the function calls
voxelizationLaunchwith the inputpointsarray and various parameters such asmin_x_range,max_x_range,pillar_x_size,max_voxels, etc. This function performs voxelization on the input points, generates a hash table to map voxel offsets to voxel IDs, and records the number of points per voxel ind_voxel_num_. The result is stored invoxels_temp_. -
Synchronization: After voxelization, the function synchronizes the CUDA stream to ensure that the previous kernel launch and memory operations are completed before proceeding.
-
Feature Extraction: The function then calls
featureExtractionLaunchwithvoxels_temp_and other related parameters. This function calculates the average of each feature (x, y, z, intensity, t) for each voxel and stores the results in thed_voxel_features_memory region using thed_voxel_num_information. -
Final Synchronization: Lastly, the function synchronizes the CUDA stream again to ensure all computations are completed, and then it returns 0 to indicate successful execution.
Overall, this function efficiently processes a large number of points by leveraging the parallel processing power of the GPU, leading to faster voxelization and feature extraction, crucial steps in point cloud processing and 3D data analysis.
This completes the code deep dive of all crucial components of performing Voxelization on GPU using CUDA Kernels. Now, in the next section, we will get some insights on the speed improvements provided by the GPU by comparing it with just CPU based Voxelization.
5. Conclusion
We have already looked at how to make the executable perform Voxelization on both GPU and CPU. But let us revisit the command. By default the executable will just perform CUDA based Voxelization on GPU. To also perform voxelization on the CPU, execute with the --cpu flag.
./voxelize_cuda ../data/test/ --cpu
The output of this command will looks something like this :
You can expect an output similar to this:
GPU has cuda devices: 1
----device id: 0 info----
  GPU : GeForce RTX 2060
  Capbility: 7.5
  Global memory: 5912MB
  Const memory: 64KB
  SM in a block: 48KB
  warp size: 32
  threads in a block: 1024
  block dim: (1024,1024,64)
  grid dim: (2147483647,65535,65535)
-------------------------

Total 10
Average GPU Voxelization Time : 0.643269
Average CPU Voxelization Time : 374.432
Average GPU vs CPU Speedup : 582.076x times

Let than sink in for a moment. The GPU-based Voxelization, driven by the incredible CUDA programming, has showcased an astronomical performance boost of over 580 times compared to the traditional CPU approach. It’s like witnessing a swift and majestic leap from a snail’s pace to warp speed travel. The difference is staggering. To put this into perspective, if this process took 1 second for the GPU using CUDA programming, it would take around 10 minutes for the same process on the CPU. This is what 580x time means.
The potential of CUDA programming is awe-inspiring and goes far beyond just voxelization. These concepts open doors to a world of possibilities in diverse fields. Whether it’s 3D detection, medical imaging, simulations, or artificial intelligence, CUDA unleashes a new dimension of coding brilliance.
So, fasten your seatbelts as you venture into the thrilling realm of CUDA programming. Embrace the power and speed it offers, and watch your code transform into a force to be reckoned with. Sure, the journey might have its challenges, but the jaw-dropping speedup you’ll achieve is absolutely worth the effort.
With CUDA, the sky is no longer the limit; it’s just the beginning. So go forth and conquer the universe of parallel programming! 🚀💻
That concludes our exhilarating exploration of GPU-based Voxelization using CUDA. Happy coding, and may your adventures in parallel programming be as thrilling as this one!
Enjoy Reading This Article?
Here are some more articles you might like to read next: